New Functionality In Microsoft Dynamics 365 Business Central 2024 Wave 1: Access Worksheet Pages from Mobile Phones

Microsoft Dynamics 365 Business CentralThis post is part of the New Functionality In Microsoft Dynamics 365 Business Central 2024 Wave 1 series in which I am taking a look at the new functionality introduced in Microsoft Dynamics 365 Business Central 2024 Wave 1.

The 4th of the new functionality in the User experiences section is Access worksheet pages from mobile phones.

Expanding access to more Business Central areas from a mobile device is essential these days as more users are choosing this way of working. Until now, you couldn’t open worksheet pages from your phone. Now you can, making it more convenient to work with Business Central from anywhere using the device of your choice.

Enabled for: Users, automatically
Public Preview: Apr 2024
General Availability: Apr 2024

Feature Details

With this feature, we’ve enabled special, simplified access to pages of the type ‘worksheet’ from mobile phones. Previously, this page type was only available on the Business Central mobile app from tablets or desktops.

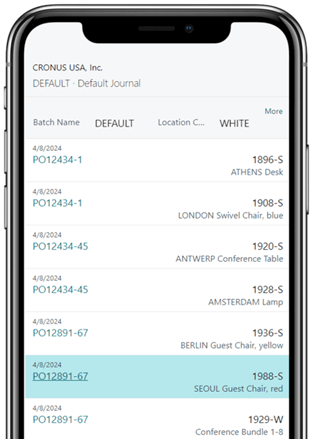
Using a method similar to document pages, worksheet pages are rendered in a simplified version that includes a shortened header section, all worksheet lines, and a footer summary section.

To edit data, simply tap the desired area, make changes, and confirm using the Save or Back button. This feature allows even complex worksheet pages to be easily operated on mobile phones.

This feature requires Business Central version 24.0 or later and applies to Android phones and iPhones.

Worksheet pages on a phone device

My Opinion

I am not a huge fan of using a mobile phone for anything complex as I think that the screen is far too small to work effectively. However, I also know many other people who will happily do quite involved things on their phone, and this enhancement looks to be for that type of person; it is good to see that more and more of Business Central is becoming widely available on devices of all sizes.

Click to show/hide the New Functionality In Microsoft Dynamics 365 Business Central 2024 Wave 1 Series Index

New Functionality In Microsoft Dynamics 365 Business Central 2024 Wave 1
Use Virtual Tables to Expose More Business Central Data in Dataverse
Improve Approval Processes via Power Automate
Add Table and Field Mappings for Existing Integration Tables
Find a Matching Record in a Power Automate Flow
Archive Projects
Usability Improves for Service and Projects
Use Deferral Codes in Purchase and Sales Journals
Define a Service Invoice Posting Policy for Various Users
Define Default Location for Project or Project Phase
Block Item, Item Variant or Service Item from Use in Service Management transactions
Connect Business Central With Shopify B2B
Set Up Financial Consolidation Runs More Efficiently
Simpler Shopify Connection
Use General Ledger Account Revaluation for More Accurate Financial Statements
Get More Productive While Entering Time Sheets
Create Projects That You Can Invoice to Multiple Customers
Assemble to Project
Invoice a Customer for Multiple Projects
Use New Excel Layouts for 35 Selected Reports
Use Standard Terminology for Project Management
Use Currencies When Posting Employee Transactions
Manage Work Orders in Field Service, Invoice Them in Business Central
Manage Document Attachments in Service Items and Documents
Export and Import Multiline Text Using Configuration Packages
Correct Errors in Service Invoices
Prevent Editing Number Series on Service Documents and Cards
Be More Productive When Approving Time Sheets
Inventory Package Numbers Work Like Item Tracking Dimensions
Assign Salesperson to Customer Ship-to Addresses
View Incoming Documents in Archived Quotes and Orders
Specify Dimensions on Posted Entries Applications With Realized Gains or Losses
Allow Lines with Amounts of Zero on Recurring General Journals
Automate the Reminders Process in Collections
See Improved Usability for Warehouse and Inventory
Ensure Accurate Inventory Valuation by Controlling Cost Adjustment
Use a New Role Center for Collection Management
Manage Subscription Billing and Revenue and Expense Recognition
Enable Sustainability Features for Integrations with APIs
Install Field Service Integration with Business Central from AppSource
Introduce Power Automate Copilot Integration with Business Central
Map e-Documents to Purchase Order Lines with Copilot
Create Sales Lines Easily with Copilot
Extend Copilot Using Richer Development Tools
Get to Insights Faster with Copilot-Generated Analysis Tabs
Complete Bank Account Reconciliation Faster With Copilot
Create Product Information Faster with Copilot
Learn More About Fields with Copilot
Chat with Copilot
Simplify collections with Copilot for Finance and Business Central
Automate Tests for your Copilot Extensions with the Business Central Test Toolkit
Automate IRS 1099 Form Submission in US
Enable Additional Countries and Regions
Install UK Localization as an App
Process Czech Bank Statements, Payment Orders More Productively
Improvement of Czech Localization Reports
Report Explorer has Additional Outputs in the Czech Version
Improved Updates of ARES Data in the Czech Version
Allow More Extendability of Advance Payments in the Czech Version
Print QR Codes on Sales Invoices in the Czech Version
Use Excel Layouts for Czech Reports
Handle Multiple File Uploads and File Drop Zones
Debug the System Application
Remove Friction When Working with External App Dependencies
Use In-client Page Scripting Tool for Acceptance Testing
Use AL-controlled Barcode Scanning For All Scenarios
Write flexible and performant code with NumberSequences
Use the OData V4 IN Operator in Web Service Queries
Define Extension Objects in Same App as Their Base Object
Use Cookies in HTTP Calls From Business Central
Define Tooltips on Table Fields
Use Linked Environment in Dataverse Integration
Audit Business Central Operations in Microsoft Purview
Encrypt Data At-Rest with Customer-Managed Encryption Key
Allow Customers to Consent to Microsoft Support Accessing Their Data
Link Business Central Environments to Power Platform Environments
Copy Companies with Dataverse Integration Safely
View and Filter Users With Additional User Details
Control partner access per environment
Analyze Telemetry Events Across Browser and Server for a Session or User
Use Premium License to Sign In to Environment with Essentials Licenses
Experience the New Embedded AppSource Marketplace Page
Migrate Record Links and Notes with Cloud Migration Tooling
See VAT Date in Posting Previews
Automate Country of Origin Listed for Item Tracking Code in Intrastat Reporting
Achieve Sustainable Compliance with Business Central
Discover Report and Data Analysis Content Easily
Use Drag and Drop to Attach Multiple Files
Use Actions to Navigate and Highlight or Fix Platform-Generated Errors
Share Error Details to Get Help from Another User
Access Worksheet Pages from Mobile Phones
Boost Productivity With the Modern Action Bar
Enhancements to the User Experience

Microsoft Excel Showing Formula Instead of Result

Microsoft OfficeI was doing some work with a client a while ago and encountered a problem with Excel where it was showing me the formula in a call, rather than the result of the formula. I have no idea if the spreadsheet was sent to me with the formulas set this way (I’m not sure if this is possible) or if I inadvertently hit the keyboard combination to enable the setting at some point (Alt + M and then Alt + H).

It took me longer than it should have done to revert Excel back, so I am posting this as a reminder should it happen again.

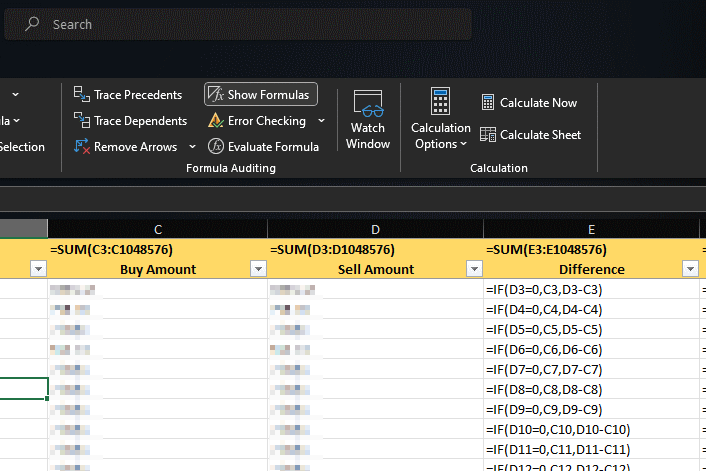
To switch this setting off, select the Formulas tab on the action pane and, under Formula Auditing, click Show Formulas, which will toggle the setting off (or on if it is currently off):

Excel example showing formulas and the Show Formulas button highlighted

VAT Bus. Posting Group Error in Get Shipment Lines in Microsoft Dynamics 365 Business Central

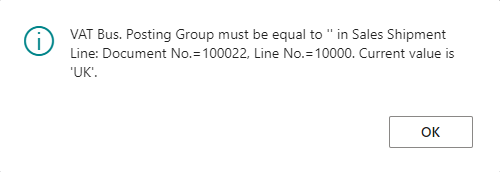
Microsoft Dynamics 365 Business CentralWhile working with a client recently to implement Microsoft Dynamics 365 Business Central, they reported an error to me during UAT when trying to test the sales process. They’d raised and shipped a sales order and were now trying to use the Get Shipment Lines function on the Sales Invoice page, but when selecting the shipment lines they were receiving this error:

Error using Get Shipment Lines function

VAT Bus. Posting Group must be equal to '' in Sales Shipment Line: Document No.=100022. Current value is 'UK'.

I did a little investigation with them and discovered that the error was for a single customer; shipment lines for other customers could be selected without problem.

It turned out the root cause was that the customer did not have a VAT Bus. Posting Group selected on the customer card; this field would default to the sales order header and then pull through to the order lines as they are added. Because it was missing, the user had manually added the VAT details to the order lines, but not the header. When the sales invoice was raised, the VAT Bus. Posting Group did not default to the header, so when the shipment lines were selected there was a mismatch resulting in the error message.

Once the VAT was added to the header (and the customer card so it would default in future), the sales shipment lines could successfully be added to the invoice.

I had advised the customer that customer templates should be used to default in the required fields on customers as they are created, but they had not done this. A customer template created for each geography (UK, EU, ROW) would have allowed the VAT Bus. Posting Group, and other posting groups and fields like payment terms, to default when the customer was created.

Error Calculating Depreciation in Microsoft Dynamics 365 Business Central: “No journal lines were created”

Microsoft Dynamics 365 Business CentralI helped a client implement the Fixed Asset Management module in Microsoft Dynamics 365 Business Central recently; during training I showed them how to configure and use the module and also created configuration packages for them to import both the fixed asset itself as well as the acquisition and depreciation to date.

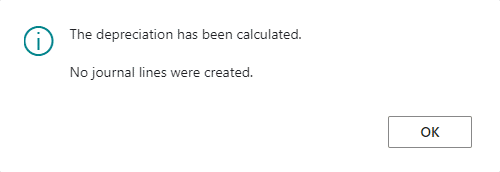
After importing the assets into Business Central with a net book value up to the last day of the previous month, they tried to run depreciation for the assets, but encountered a problem where no depreciation was calculated:

Error trying to depreciate fixed assets

The depreciation has been calculated

No journal lines were created.

They keyed a new asset onto the system and tried depreciation and that asset did depreciate so there was obviously no general problem with the setup of the module, depreciation book or assets.

Looking at the data in the table, there was no obvious difference between them; there were a few fields different such as dates, values and similar in the Fixed Asset (5600) and FA Depreciation Book (5612) tables, but nothing which would impact the depreciation. It actually took a colleague to spot the difference, as I was reading the field as being the net book value (which is actually in the Book Value field, but was in fact the Ending Book Value field, which is used to set a residual amount for depreciation, below which the asset won’t depreciate.

When the client populated the configuration package, they had not remembered my mentioning this field during training, and for what it was intended, and entered the same value in both the Book Value and Ending Book Value fields, so Business Central was treating the assets as depreciated as far as they should depreciate. A quick configuration package update to the Ending book Value and the assets were able to be depreciated as required.

In Microsoft Dynamics 365 Business Central (Inventory and Warehouse Management), how do I… Mass Insert Item Pictures

Microsoft Dynamics 365 Business CentralThis post is part of the In Microsoft Dynamics 365 Business Central (Inventory and Warehouse Management), how do I… series and of the wider In Microsoft Dynamics 365 Business Central, how do I… series which I am posting as I familiarise myself with Microsoft Dynamics 365 Business Central.

Business Central allows pictures to be attached to each item on the Item card page, but doing it individually through this page will be a very slow process, even for quite small systems. Fortunately, there is a function which allows the bulk import of pictures for items.

To use the import, all you need is a zip file containing the items, where the name of the file is the Item Number and the file is an image file such as bmp, jpg or png (the help files aren’t especially helpful as to acceptable types, but I have seen these three used). I would recommend that the images imported not be too large; use a reasonable resolution image and be run them through a minifier to use the best encoding.

When you have your import ready, open the Inventory Setup page and select the General » Import Item Pictures action:

Inventory Setup page showing the General action bar

Continue reading “In Microsoft Dynamics 365 Business Central (Inventory and Warehouse Management), how do I… Mass Insert Item Pictures”

Microsoft Dynamics 365 Business Central Configuration Package Import Error: “The package code in all sheets of the Excel file must match the selected package code…”

Microsoft Dynamics 365 Business CentralI’ve been doing some work with a client recently to implement Microsoft Dynamics 365 Business Central. We created a number of different configuration packages to import data into different areas of Business Central which were used without issue.

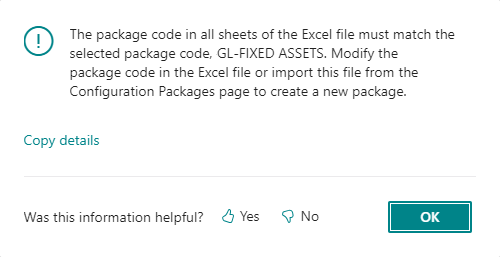
However, when we came to import the fixed assets, we received an error during import:

Configuration Package error

The package code in all sheets of the Excel file must match the selected package code, GL-FIXED-ASSETS. Modify the package code in the Excel file or import this file from the Configuration Packages page to create a new package.

Continue reading “Microsoft Dynamics 365 Business Central Configuration Package Import Error: “The package code in all sheets of the Excel file must match the selected package code…””

Item No. Field Missing from the Item Card Page in Microsoft Dynamics 365 Business Central

Microsoft Dynamics 365 Business CentralWhile implementing Microsoft Dynamics 365 Business Central for a client, they reported an issue during UAT where they couldn’t set the No. for new items as the field was missing from the Item Card (30) page.

My initial thought was that the user had inadvertently removed the field from the page using personalise, but they had asked other users to try and they had the same issue. The other potential cause, was a profile personalization which had removed the field for all users, but this was also not the case, as the field wasn’t available to add back.

I did a test with a role containing no changes and found the same issue:

Item card page with the No. field missing

Continue reading “Item No. Field Missing from the Item Card Page in Microsoft Dynamics 365 Business Central”

New Functionality In Microsoft Power Automate 2024 Wave 1: View Attended Desktop Flow Runs Using Picture-in-Picture Execution Mode

Power AutomateThis post is part of the New Functionality In Microsoft Power Automate 2024 Wave 1 series in which I am taking a look at the new functionality introduced in Microsoft Power Automate 2024 Wave 1.

The 9th of the new functionality in the Desktop Flows section is view attended desktop flow runs using picture-in-picture execution mode.

The flow run does not interfere with the user’s work on the machine as makers can run attended desktop flows in a virtual window that replicates the main desktop.

Enabled for: Admins, makers, marketers, or analysts, automatically
Public Preview: Feb 2024
Early Access: –
General Availability: Apr 2024

Feature Details

Makers can trigger attended and local attended desktop flows within an isolated Windows session in picture-in-picture mode. You can trigger the picture-in-picture mode through the Power Automate console, or through the desktop flows connector.

Click to show/hide the New Functionality In Microsoft Power Automate 2024 Wave 1 Series Index

New Functionality In Microsoft Power Automate 2024 Wave 1
Use Generative AI to Achieve a Process in AI Flows
Receive Intelligent License Recommendations for Admins
Be More Productive with Power Automate and Excel Desktop
View a Power Automate Visual in a Power BI Report
Monitor Performance for Cloud and Desktop Flow Activities
Connect to Other Environments from the Microsoft Dataverse Connector
Push Cloud Flow Execution Data into Application Insights
Use Your Own Encryption Key for Encrypting Data At-Rest for Existing Environments
Create Power Automate Flows in Excel
View Two Action Properties Panes Simultaneously
Use Undo and Redo While You Build Cloud Flows in the Designer
Use Copy-Paste for Container Actions Like Scope, Condition, and Apply to Each
Use a Simplified OData Editor in Actions like Get Items and Get Files
Manage Unpublished Solution-Aware Cloud Flows Using Admin APIs
Cancel all Flow Runs for a Version of a Flow
Create a Flow on a File in Teams
Cloud Flows are Automatically Defined in Dataverse Solutions
Use Workflows on Calendar Events in Teams and Outlook
Create AI Flows in Power Automate
Use Copilot with French Language
Recommendations to Reassign Orphaned Cloud Flows
Generate Descriptions for Cloud Flows using AI
Use Flows with Connections from Users in Copilot Studio
Use Process Mining Microsoft 365 Personal Recommendations
Create and Edit Expressions with Copilot
Get Quick Insights and Recommendations in Copilot for Process Mining
Troubleshoot with Copilot for Cloud Flows Execution
Automate With Ease Using the AI Recorder
Enter into a Conversation-first Copilot Experience to Build Flows
Transform Scripting Using AI-driven Natural Language
Maximize Your Productivity with Generative Answers
Streamline Workflow Creation with the Next Best Action
Generate Flow Description Using AI
Use Natural Language to Create a Flow in Teams
Leverage Desktop Automation with the Power Automate Plugin for Windows Copilot
Set Up Fallback UI Automation Mechanism
Power Fx Integration with Power Automate for Desktop
Use Power Platform Connectors in Power Automate for Desktop Actions
Use CyberArk Credentials in Desktop Flow Connections
Use Azure Key Vault Credentials in Flow Connections
Connect Your Own Virtual Network with Hosted Machine Group
View Attended Desktop Flow Runs Using Picture-in-Picture Execution Mode
Self-heal UI and Browser Automation Actions at Execution with AI
Use the Run Power Fx Expression
Use Python v3 in Power Automate for Desktop
Use Machine to Credential Mapping in Desktop Flow Connections
Create a Reusable Collection of UI Elements
Use Customer-managed Encryption Key for Hosted RPA
Automation Center to Monitor and Manage All Your Automations and Related Assets
Trigger Attended Desktop Flows in Picture-in-Picture
Use Copilot in Automation Center to Analyze Cloud Flow Runs
Trigger Attended Desktop Flows in Picture-in-Picture Mode Through the Power Automate Console
Use Copilot in Automation Center to Analyze Desktop Flow Runs
Use Copilot in Automation Center to Analyze Work Queue Data
Use Copilot in Automation Center to Ask Power Automate Product Questions
Use New Data Table Actions
Use New Excel Actions in Power Automate for Desktop
Use the New Desktop Flow Running Timeout Property
Ingest Process Data from Customers' Data Lake
Scale Faster with Power Automate Process Mining Thin Client App

New Functionality In Microsoft Power Automate 2024 Wave 1: Connect Your Own Virtual Network with Hosted Machine Group

Power AutomateThis post is part of the New Functionality In Microsoft Power Automate 2024 Wave 1 series in which I am taking a look at the new functionality introduced in Microsoft Power Automate 2024 Wave 1.

The 8th of the new functionality in the Desktop Flows section is connect your own virtual network with hosted machine group.

Users can run desktop flows using a hosted machine group connected to their own virtual network (VNet) in order to execute RPA jobs that require access to on-premises networks.

Enabled for: Admins, makers, marketers, or analysts, automatically
Public Preview: Mar 2024
Early Access: –
General Availability: Apr 2024

Feature Details

Users can now seamlessly integrate a hosted machine group (HMG) with their own VNet. This integration enables users to run desktop flows and execute RPA jobs that require access to on-premises networks. By leveraging their own VNet, users can ensure secure and reliable connectivity between the hosted machines and the on-premises networks.

Click to show/hide the New Functionality In Microsoft Power Automate 2024 Wave 1 Series Index

New Functionality In Microsoft Power Automate 2024 Wave 1
Use Generative AI to Achieve a Process in AI Flows
Receive Intelligent License Recommendations for Admins
Be More Productive with Power Automate and Excel Desktop
View a Power Automate Visual in a Power BI Report
Monitor Performance for Cloud and Desktop Flow Activities
Connect to Other Environments from the Microsoft Dataverse Connector
Push Cloud Flow Execution Data into Application Insights
Use Your Own Encryption Key for Encrypting Data At-Rest for Existing Environments
Create Power Automate Flows in Excel
View Two Action Properties Panes Simultaneously
Use Undo and Redo While You Build Cloud Flows in the Designer
Use Copy-Paste for Container Actions Like Scope, Condition, and Apply to Each
Use a Simplified OData Editor in Actions like Get Items and Get Files
Manage Unpublished Solution-Aware Cloud Flows Using Admin APIs
Cancel all Flow Runs for a Version of a Flow
Create a Flow on a File in Teams
Cloud Flows are Automatically Defined in Dataverse Solutions
Use Workflows on Calendar Events in Teams and Outlook
Create AI Flows in Power Automate
Use Copilot with French Language
Recommendations to Reassign Orphaned Cloud Flows
Generate Descriptions for Cloud Flows using AI
Use Flows with Connections from Users in Copilot Studio
Use Process Mining Microsoft 365 Personal Recommendations
Create and Edit Expressions with Copilot
Get Quick Insights and Recommendations in Copilot for Process Mining
Troubleshoot with Copilot for Cloud Flows Execution
Automate With Ease Using the AI Recorder
Enter into a Conversation-first Copilot Experience to Build Flows
Transform Scripting Using AI-driven Natural Language
Maximize Your Productivity with Generative Answers
Streamline Workflow Creation with the Next Best Action
Generate Flow Description Using AI
Use Natural Language to Create a Flow in Teams
Leverage Desktop Automation with the Power Automate Plugin for Windows Copilot
Set Up Fallback UI Automation Mechanism
Power Fx Integration with Power Automate for Desktop
Use Power Platform Connectors in Power Automate for Desktop Actions
Use CyberArk Credentials in Desktop Flow Connections
Use Azure Key Vault Credentials in Flow Connections
Connect Your Own Virtual Network with Hosted Machine Group
View Attended Desktop Flow Runs Using Picture-in-Picture Execution Mode
Self-heal UI and Browser Automation Actions at Execution with AI
Use the Run Power Fx Expression
Use Python v3 in Power Automate for Desktop
Use Machine to Credential Mapping in Desktop Flow Connections
Create a Reusable Collection of UI Elements
Use Customer-managed Encryption Key for Hosted RPA
Automation Center to Monitor and Manage All Your Automations and Related Assets
Trigger Attended Desktop Flows in Picture-in-Picture
Use Copilot in Automation Center to Analyze Cloud Flow Runs
Trigger Attended Desktop Flows in Picture-in-Picture Mode Through the Power Automate Console
Use Copilot in Automation Center to Analyze Desktop Flow Runs
Use Copilot in Automation Center to Analyze Work Queue Data
Use Copilot in Automation Center to Ask Power Automate Product Questions
Use New Data Table Actions
Use New Excel Actions in Power Automate for Desktop
Use the New Desktop Flow Running Timeout Property
Ingest Process Data from Customers' Data Lake
Scale Faster with Power Automate Process Mining Thin Client App

Error When Connecting Jet Reports to Microsoft Dynamics 365 Business Central for the First Time

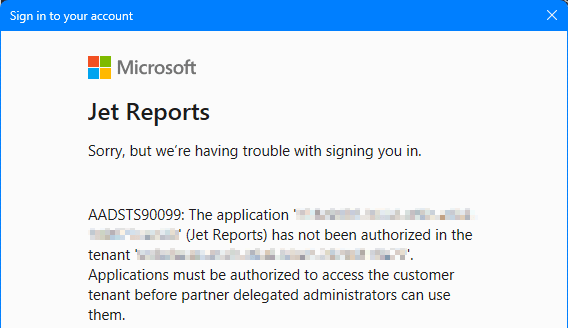
Jet ReportsWhile implementing Microsoft Dynamics 365 Business Central recently for a client, we also implemented Jet Reports. After installing the extension in Business Central, I created a data source and tried to log in, but received this error message:

Jet reports sign in error

Jet reports

Sorry, but we're having trouble with signing you in.

AADSTS90099: The application '~~~~~~~' (Jet Reports) has not been authorised in the tenant '~~~~~~~'. Applications must be authorised to access the customer tenant before partner delegated administrators can use them.

It’s actually an obvious one which I should have remembered; the first sign into the data source is the one which grants permissions to sign in and so needs to be done by a Microsoft 365 administrator for the Business Central tenant.

As the Business Central partner, this was not me. After co-ordinating with the client and their Microsoft 365 partner, we got an administrator to sign into the data source for the first time, granting permissions as they did so, after which I was able to confirm the data source worked and giving users at the client access.