In Microsoft Dynamics 365 Business Central (Inventory and Warehouse Management), how do I… Process an Inventory Put-away Document

Microsoft Dynamics 365 Business CentralThis post is part of the In Microsoft Dynamics 365 Business Central (Inventory and Warehouse Management), how do I… series and of the wider In Microsoft Dynamics 365 Business Central, how do I… series which I am posting as I familiarise myself with Microsoft Dynamics 365 Business Central.

In a previous article of this series on understanding inventory put-aways, I mentioned there was three ways in which an inventory put-away could be processed and which I covered over the last few articles:

  1. Process an Inventory Put-away from the Source Document
  2. Process Multiple Inventory Put-aways Using a Batch Job
  3. Process an Inventory Put-away in Two Steps by Releasing the Source Document

Once the inventory put-away activities have been created, they need to be procssed. Do this by performing a search for Inventory Put-aways and, from the list page which opens, select one of the activities:

Inventory Put-ways page

Continue reading “In Microsoft Dynamics 365 Business Central (Inventory and Warehouse Management), how do I… Process an Inventory Put-away Document”

In Microsoft Dynamics 365 Business Central (Inventory and Warehouse Management), how do I… Process an Inventory Put-away in Two Steps by Releasing the Source Document

Microsoft Dynamics 365 Business CentralThis post is part of the In Microsoft Dynamics 365 Business Central (Inventory and Warehouse Management), how do I… series and of the wider In Microsoft Dynamics 365 Business Central, how do I… series which I am posting as I familiarise myself with Microsoft Dynamics 365 Business Central.

In a previous article of this series on understanding inventory put-aways, I mentioned there was three ways in which an inventory put-away could be processed:

  1. Process an Inventory Put-away from the Source Document
  2. Process Multiple Inventory Put-aways Using a Batch Job
  3. Process an Inventory Put-away in Two Steps by Releasing the Source Document

In this article, I am going to take walk through the processing an inventory put-away using a two step process using the BLUE location on which I enabled Require Put-away.

The first step is an ordinary one when processing a purchase order; that of releasing the document which is done by clicking Release » Release. This is something which you usually have to do in order to email or print he PO document to the vendor.

released purchase order

Continue reading “In Microsoft Dynamics 365 Business Central (Inventory and Warehouse Management), how do I… Process an Inventory Put-away in Two Steps by Releasing the Source Document”

In Microsoft Dynamics 365 Business Central (Inventory and Warehouse Management), how do I… Process Multiple Inventory Put-aways Using a Batch Job

Microsoft Dynamics 365 Business CentralThis post is part of the In Microsoft Dynamics 365 Business Central (Inventory and Warehouse Management), how do I… series and of the wider In Microsoft Dynamics 365 Business Central, how do I… series which I am posting as I familiarise myself with Microsoft Dynamics 365 Business Central.

In a previous article of this series on understanding inventory put-aways, I mentioned there was three ways in which an inventory put-away could be processed:

  1. Process an Inventory Put-away from the Source Document
  2. Process Multiple Inventory Put-aways Using a Batch Job
  3. Process an Inventory Put-away in Two Steps by Releasing the Source Document

In this article, I am going to take walk through processing inventory put-aways using a batch job for the BLUE location on which I enabled Require Put-away.

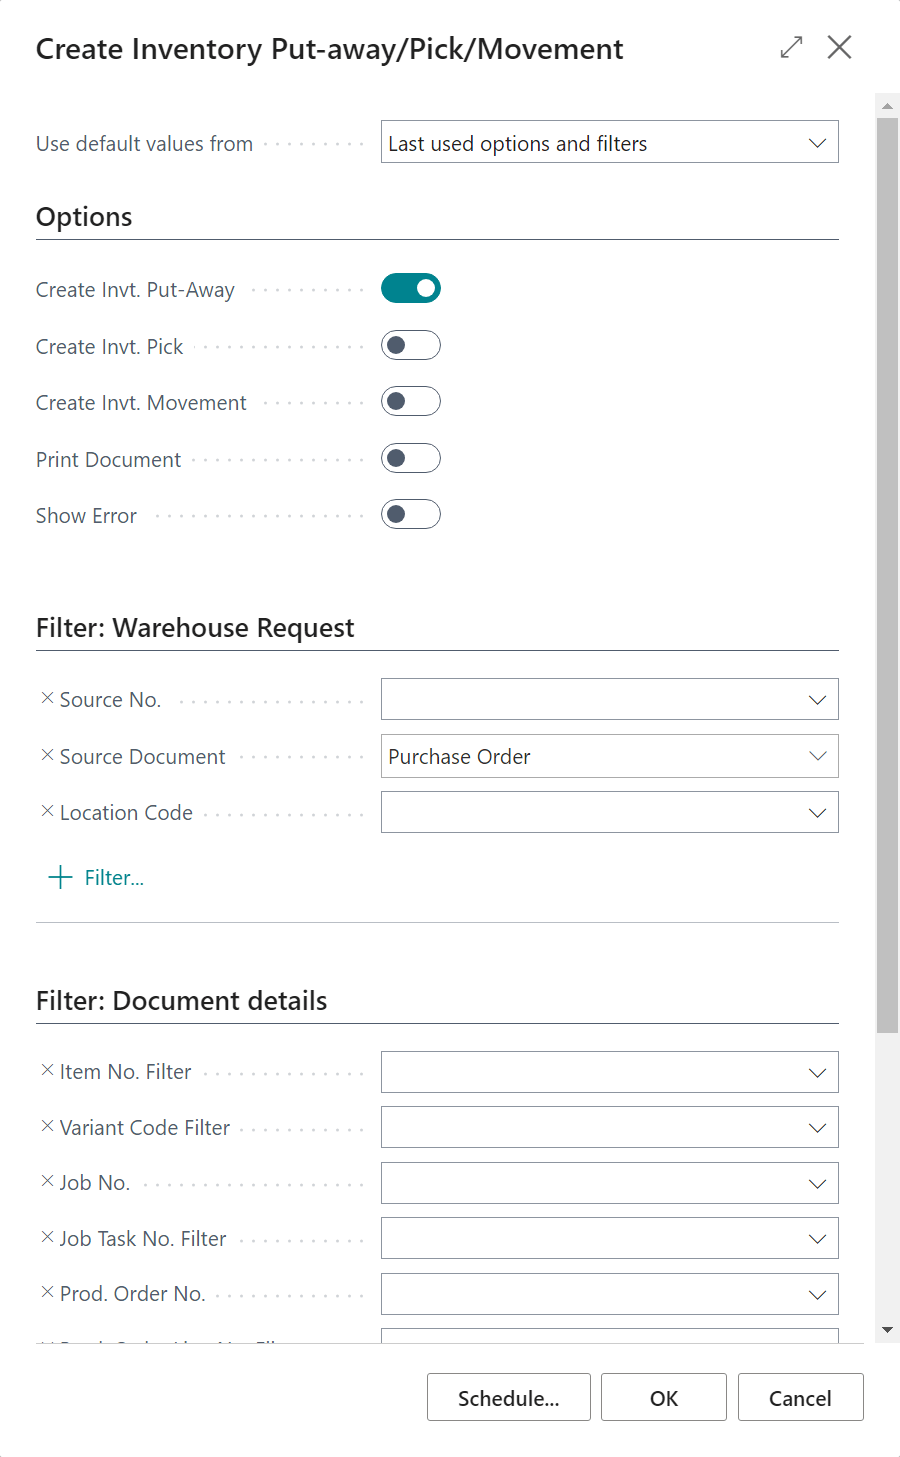
To use the batch job for creating inventory put-aways, search for the Create Inventory Put-away/Pick/Movement page.

The options on this page will need to be configured to restrict which incoming documents have inventory put-aways created. I have opted for all (released) purchase orders; click OK to create the put-aways or Schedule to schedule the batch job to run at a designated time:

Create Inventory Put-away/Pick/Movement

Continue reading “In Microsoft Dynamics 365 Business Central (Inventory and Warehouse Management), how do I… Process Multiple Inventory Put-aways Using a Batch Job”

In Microsoft Dynamics 365 Business Central (Inventory and Warehouse Management), how do I… Process an Inventory Put-away from the Source Document

Microsoft Dynamics 365 Business CentralThis post is part of the In Microsoft Dynamics 365 Business Central (Inventory and Warehouse Management), how do I… series and of the wider In Microsoft Dynamics 365 Business Central, how do I… series which I am posting as I familiarise myself with Microsoft Dynamics 365 Business Central.

In a previous article of this series on understanding inventory put-aways, I mentioned there was three ways in which an inventory put-away could be processed:

  1. Process an Inventory Put-away from the Source Document
  2. Process Multiple Inventory Put-aways Using a Batch Job
  3. Process an Inventory Put-away in Two Steps by Releasing the Source Document

In this article, I am going to take walk through the processing an inventory put-away from the source document using the BLUE location on which I enabled Require Put-away.

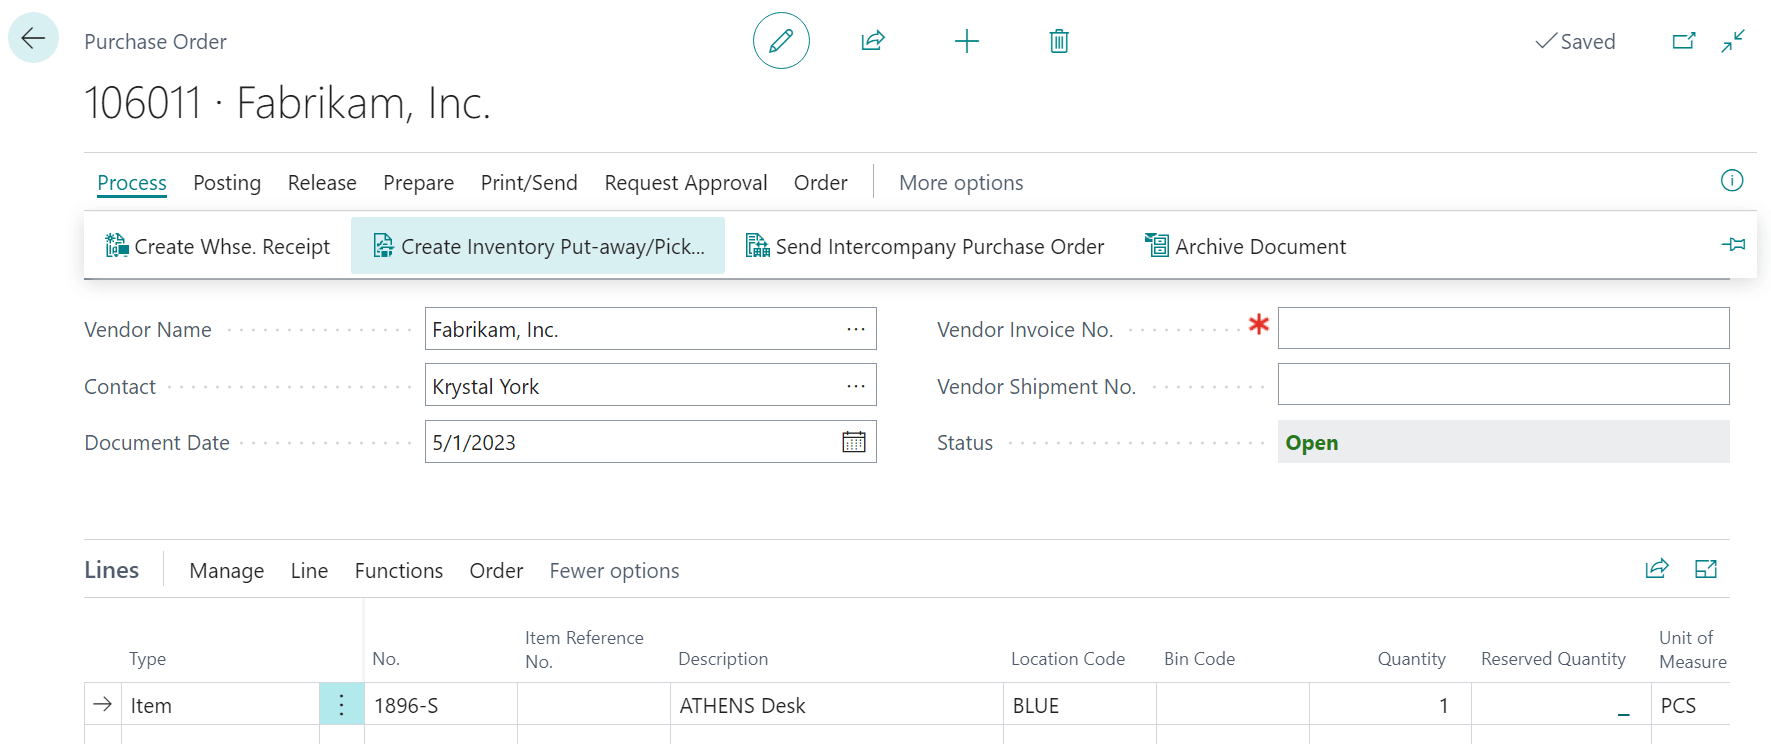
To create an inventory put-away for a purchase order, open the Purchase Order page and click the Process » Create Inventory Put-away/Pick/Movement action:

Purchase Order page showing the put-away action button

Continue reading “In Microsoft Dynamics 365 Business Central (Inventory and Warehouse Management), how do I… Process an Inventory Put-away from the Source Document”

In Microsoft Dynamics 365 Business Central (Inventory and Warehouse Management), how do I… Configure Inventory Put-aways

Microsoft Dynamics 365 Business CentralThis post is part of the In Microsoft Dynamics 365 Business Central (Inventory and Warehouse Management), how do I… series and of the wider In Microsoft Dynamics 365 Business Central, how do I… series which I am posting as I familiarise myself with Microsoft Dynamics 365 Business Central.

In order to use inventory put-aways, there is only one setting which needs to be configured, but it needs to be done on a per location basis.

For this example, I am using the CRONUS USA sample company and have created a new location called BLUE.

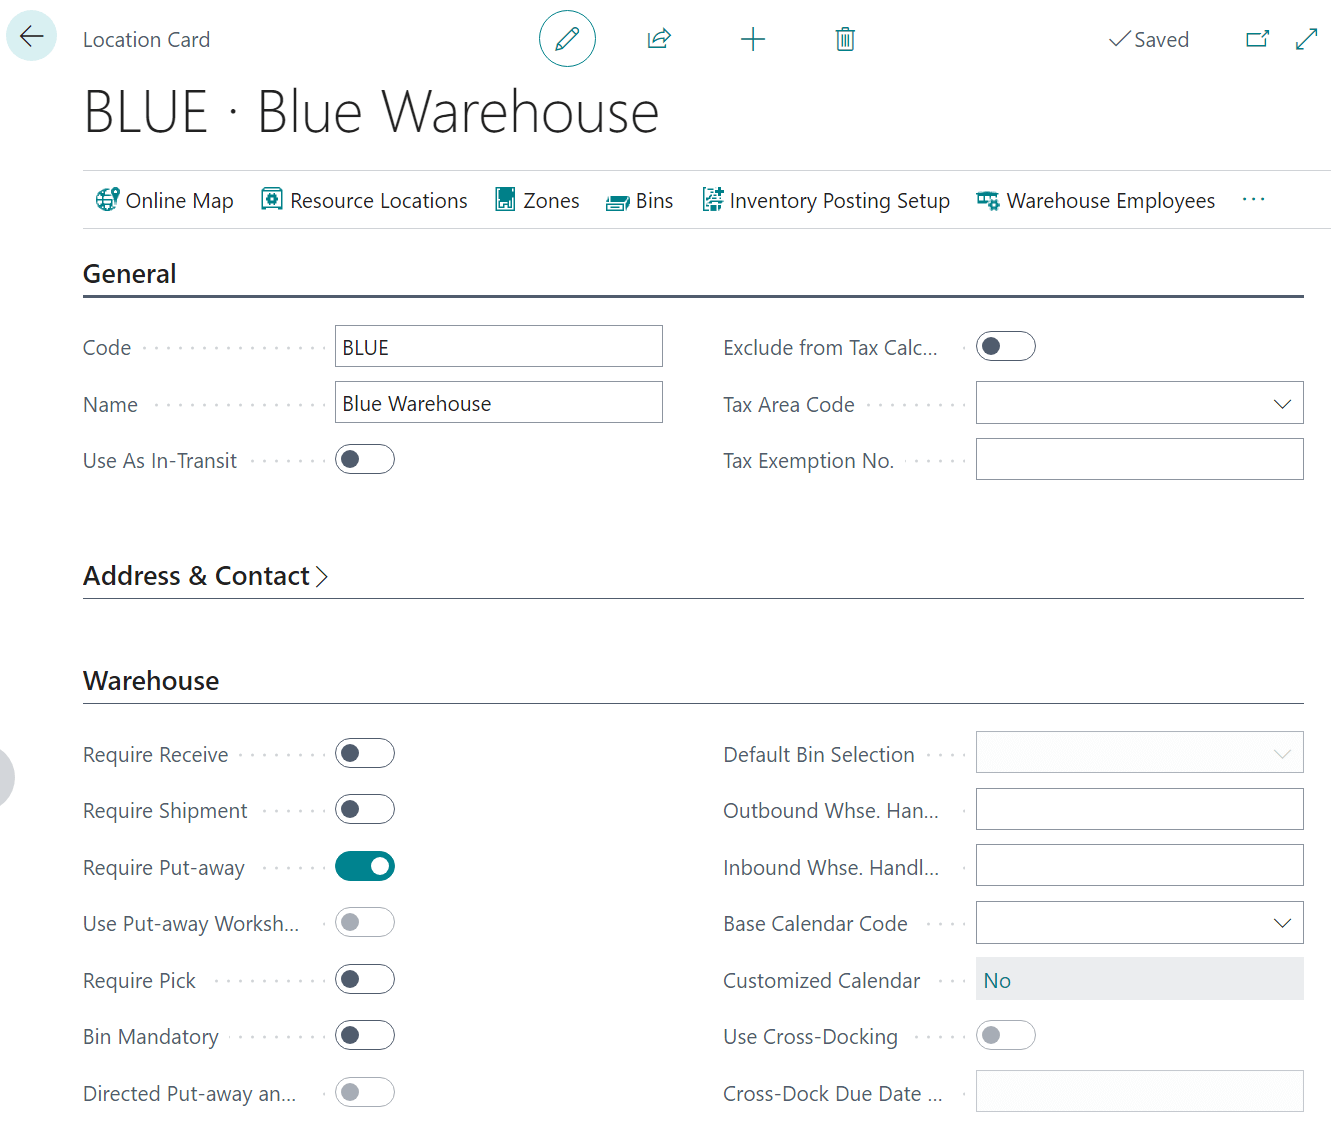
To configure the require put-away option, search for the Locations page and select the required location. On the Warehouse fasttab, enable the Require Put-away option:

Locations - Enable Require Put-away on new BLUE location

You will also need to make sure that there is a number series attached to the Inventory Put-aways Nos. and Posted Inventory Put-aways Nos. fields on the Inventory Setup card.

Bins can be used with inventory put-away documents, so you can also mark the Bin Mandatory option.

In Microsoft Dynamics 365 Business Central, how do I…

In Microsoft Dynamics 365 Business Central (Inventory and Warehouse Management), how do I…

In Microsoft Dynamics 365 Business Central (Inventory and Warehouse Management), how do I… Understand Inventory Put-aways in Basic Warehousing

Microsoft Dynamics 365 Business CentralThis post is part of the In Microsoft Dynamics 365 Business Central (Inventory and Warehouse Management), how do I… series and of the wider In Microsoft Dynamics 365 Business Central, how do I… series which I am posting as I familiarise myself with Microsoft Dynamics 365 Business Central.

As I mentioned in this article on the different levels of inventory and warehouse management, put-aways are used in basic warehousing for order-by-order processing; if we were also using require receipts, then put-aways would be done with a warehouse put-away, rather than an inventory put-away. I’ll cover warehouse put-aways in a future article.

The inventory put-away is used to put items away order by order and posts the receipt as part of this action. The order, in this context, may not be a purchase order, but could also be a sales return order or an inbound transfer order.

An inventory put-away can be created in three ways:

  1. Directly from the source document itself.
  2. Using batch job for several source documents at the same time.
  3. In two steps by first by releasing the source document to make the items available to be put away by using the Inventory Put-away page.

In Microsoft Dynamics 365 Business Central, how do I…

In Microsoft Dynamics 365 Business Central (Inventory and Warehouse Management), how do I…

Microsoft Dynamics 365 Business Central User Can’t See Manufacturing Pages Despite Permissions

Microsoft Dynamics 365 Business CentralI fielded a query from a customer recently where they reported that when doing some testing in a Microsoft Dynamics 365 Business Central sandbox environment (they were considering using the Manufacturing functionality), they had assigned permission sets which gave access to Manufacturing windows, but when they searched or browsed the role explorer they could not see the pages from manufacturing that they expected:

Role Explorer without Manufacturing pages

Continue reading “Microsoft Dynamics 365 Business Central User Can’t See Manufacturing Pages Despite Permissions”

New Functionality In Microsoft Dynamics 365 Business Central 2023 Wave 2: Use Actions to Navigate or Fix Errors From Inline Validation Dialog

Microsoft Dynamics 365 Business CentralThis post is part of the New Functionality In Microsoft Dynamics 365 Business Central 2023 Wave 2 series in which I am taking a look at the new functionality introduced in Microsoft Dynamics 365 Business Central 2023 Wave 2.

The eighth of the new functionality in the User experiences section is Use actions to navigate or fix errors from inline validation dialog.

Business Central validates data to improve its accuracy and reliability. When there’s an error, Business Central shows a small validation dialog to inform you. Microsoft have added actions on validation dialogs that take you to the problem so you can fix it, or have Business Central fix it for you when possible. The clear and actionable information in validation messages helps you quickly resolve errors so you can get about your business.

Enabled for: Users, automatically
Public Preview: Sep 2023
General Availability: Oct 2023

Feature Details

Validating data helps reduce the risk of errors and inconsistencies and raises its overall quality. However, finding errors is one thing, resolving them can be another. In the previous release wave, Microsoft introduced actions on error messages that either take you to the page where you can fix an error or have Business Central fix it for you. To further increase your ability to resolve errors yourself, Microsoft are bringing those same capabilities to validation dialogs. If you enter data that causes an error, you can go to the page where you can fix the problem or have Business Central do that for you.

New Functionality In Microsoft Dynamics 365 Business Central 2023 Wave 2

New Functionality In Microsoft Dynamics 365 Business Central 2023 Wave 2: Search for Pages and Data in the Mobile App

Microsoft Dynamics 365 Business CentralThis post is part of the New Functionality In Microsoft Dynamics 365 Business Central 2023 Wave 2 series in which I am taking a look at the new functionality introduced in Microsoft Dynamics 365 Business Central 2023 Wave 2.

The seventh of the new functionality in the User experiences section is search for pages and data in the mobile app.

More and more people use mobile phones or tablets to access Business Central. The ability to quickly find pages or data on mobile devices opens up many new possibilities for mobile scenarios.

Enabled for: Users, automatically
Public Preview: Sep 2023
General Availability: Oct 2023

Feature Details

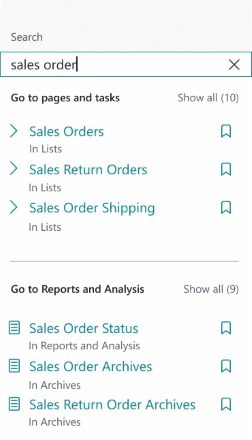
This feature adds the popular Tell Me experience to mobile devices that run the Business Central app. It also provides access to the Tell Me built-in data search.

  • The Tell Me feature is enabled in the mobile app (phone and tablet mode on iOS and Android), and users can access any page they’re allowed to.
  • Permissions are respected. Users can’t access pages they don’t have permissions to open.
  • Pages that weren’t allowed on phones before—for example, worksheet pages—aren’t available.
  • The Alt+Q keyboard shortcut is available for devices that have a physical keyboard.
  • You must turn on this feature on the Feature Management page.
  • The AppSource section is hidden on mobile devices.
  • You can bookmark pages on mobile devices like you would on your computer.
Tell Me on a mobile device

New Functionality In Microsoft Dynamics 365 Business Central 2023 Wave 2

New Functionality In Microsoft Dynamics 365 Business Central 2023 Wave 2: Peek at Summarized Data From Editable Fields

Microsoft Dynamics 365 Business CentralThis post is part of the New Functionality In Microsoft Dynamics 365 Business Central 2023 Wave 2 series in which I am taking a look at the new functionality introduced in Microsoft Dynamics 365 Business Central 2023 Wave 2.

The sixth of the new functionality in the User experiences section is Peek at summarized data from editable fields.

Peek view offers a quick and easy way to access and understand key information about related records. Peeking records can improve decision-making by providing a clear and concise overview of important information without leaving your current task.

Enabled for: Users, automatically
Public Preview: Sep 2023
General Availability: Oct 2023

Feature Details

Until now, the peek control was available only in lists and non-editable forms. You can now use the peek control to access summarized information about related records on every page, which can help you stay focused on the task at hand.

My Opinion

This sounds like it could be good, but I dp really want to see how it is implemented.

New Functionality In Microsoft Dynamics 365 Business Central 2023 Wave 2