New Functionality In Microsoft Dynamics 365 Business Central 2024 Wave 2: Enable Locations In Shopify Refunds

Microsoft Dynamics 365 Business CentralThis post is part of the New Functionality In Microsoft Dynamics 365 Business Central 2024 Wave 2 series in which I am taking a look at the new functionality introduced in Microsoft Dynamics 365 Business Central 2024 Wave 2.

The 14th of the new functionality in the Application section is enable locations in Shopify refunds.

This update significantly reduces manual intervention and the risk of errors by fully using the original return location from Shopify when synchronizing refunds and returns. It streamlines the credit memo creation process, ensuring that the location code is accurate without additional reviews.

Enabled for: Users by admins, makers, or analysts
Public Preview: –
General Availability: Oct 2024

Feature Details

This update enhances the integration between Shopify and Business Central by using the original return location from Shopify for refunds and returns. This improvement ensures accurate location data in credit memos, which reduces manual adjustments and streamlines the returns process.

To turn on the feature, on the Shopify Shop Card page, choose Original > Default Location in the new Return Location Priority field.

Return Location Priority

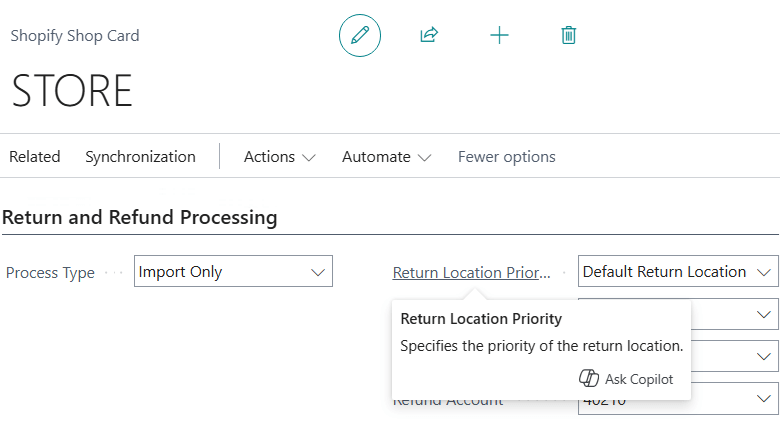
The Return Location Priority field offers the following options:

  • Default Return Location: This is the default option. It uses the value from the Default Return Location field when creating sales credit memos.
  • Original > Default Location: Select this option if you want the connector to find the original location on the Shopify refund or, if applicable, the Shopify return document. If the connector can’t find the original location, for example, when an item is restocked in several locations, it uses the Default Return Location defined on the Shopify Shop Card.

Click to show/hide the New Functionality In Microsoft Dynamics 365 Business Central 2024 Wave 2 Series Index

New Functionality In Microsoft Dynamics 365 Business Central 2024 Wave 2: Define Shipping Information For Shopify Shipping Fees

Microsoft Dynamics 365 Business CentralThis post is part of the New Functionality In Microsoft Dynamics 365 Business Central 2024 Wave 2 series in which I am taking a look at the new functionality introduced in Microsoft Dynamics 365 Business Central 2024 Wave 2.

The 13th of the new functionality in the Application section is define shipping information for Shopify shipping fees.

Map shipping fee information from Shopify to Business Central more accurately and with more flexibility. You can choose different types of shipping charges, such as G/L account, item, or item charge, and specify the shipping agent and shipping agent service.

Enabled for: Users by admins, makers, or analysts
Public Preview: –
General Availability: Oct 2024

Feature Details

In addition to the Shipping Charges Account field available on the Shopify Shop Card page, Microsoft are adding Shipping Charges Type and Shipping Charges No fields to the Shopify Shipment Method page. Adding these fields allows you to more precisely map shipping fee information from Shopify to the sales document in Business Central.

You can continue to use the G/L account defined on the Shopify Shop Card page, but if you define a Shipping Charges Type and Shipping Charges No, those values are used instead.

The Shopify Connector now supports the following types:

  • G/L Account
  • Item
  • Item Charge

Item Charge is automatically assigned to all items on the sales document.

Shopify Shipment Methods

Continue reading “New Functionality In Microsoft Dynamics 365 Business Central 2024 Wave 2: Define Shipping Information For Shopify Shipping Fees”

New Functionality In Microsoft Dynamics 365 Business Central 2024 Wave 2: Auto-Apply Templates When You Synchronize Data With Dataverse

Microsoft Dynamics 365 Business CentralThis post is part of the New Functionality In Microsoft Dynamics 365 Business Central 2024 Wave 2 series in which I am taking a look at the new functionality introduced in Microsoft Dynamics 365 Business Central 2024 Wave 2.

The 1st of the new functionality in the Adapt faster with Power Platform section is auto-apply templates when you synchronize data with Dataverse.

Businesses often enrich data that’s synchronized between Business Central and Dataverse by using templates that make the data ready to use in either application. Having a configurable, rule-based, and automated way to select the templates to apply when they synchronize data in either direction means you don’t have to extend your integration solutions with such rules, so integration between Business Central, Dataverse, and Dynamics 365 apps is faster and more cost effective.

Enabled for: Users, automatically
Public Preview: –
General Availability: Oct 2024

Feature Details

For example, when you synchronize account data from Dataverse to the customer table in Business Central, you might want to apply different configuration templates for domestic or foreign customers. Configuration templates can contain different posting groups and other settings for the customer records that synchronization creates. The synchronization engine chooses a configuration template based on the country specified for the account record in Dataverse.

On the Integration Table Mapping page, you can specify multiple configuration templates and define filters for when to apply them by choosing the link in the Table Config Template Code and Int. Tbl. Config Template Code fields.

The Table Config Template Code and Int. Tbl. Config Template Code fields show different values depending on the number of templates that you configure for a specific integration table mapping:

  • If you configure a single configuration template, the name of the configuration template shows in order to stay compatible with current capabilities.
  • If you configure multiple configuration templates, the number of configured configuration templates shows.

To set up the configuration template to apply when you synchronize data to Business Central, choose the link in the Table Config Template Code field on an integration table mapping to open the Table Config Templates page. On the Table Config Templates page, you can insert multiple configuration templates, and for each you can specify a Filter that determines which template to apply. The Priority column determines the order in which the filters for each configuration template are evaluated.

Shows Table Config Templates page with Template Code, Filter, and Priority columns

The same applies when you choose a link in the Int. Tbl. Config Template Code field.

In Microsoft Dynamics 365 Business Central (Power Automate Actions), how do I… Use the “Update Record V3” Action

Microsoft Dynamics 365 Business CentralThis article is part of the In Microsoft Dynamics 365 Business Central (Power Automate Actions), how do I… series, a sub-series of the In Microsoft Dynamics 365 Business Central (Power Automate), how do I… series and of the wider In Microsoft Dynamics 365 Business Central, how do I… series which I am posting as I familiarise myself with Microsoft Dynamics 365 Business Central.

There are a number of actions available in Power Automate for Business Central which allow specific actions against the data of Business Central to be performed from within Power Automate.

The 5th action which is available is the Update record (V3) one which allows existing records to be updated.

Within a flow, click the add action button; search for Business Central and select the Business Central icon (make sure you select the SaaS one, which is a dark colour instead of the on-premises one which is mainly white):

Choose an action dialog with Business Central in the search results

Continue reading “In Microsoft Dynamics 365 Business Central (Power Automate Actions), how do I… Use the “Update Record V3” Action”

In Microsoft Dynamics 365 Business Central (Power Automate Actions), how do I… Use the “Find One record V3” Action

Microsoft Dynamics 365 Business CentralThis article is part of the In Microsoft Dynamics 365 Business Central (Power Automate Actions), how do I… series, a sub-series of the In Microsoft Dynamics 365 Business Central (Power Automate), how do I… series and of the wider In Microsoft Dynamics 365 Business Central, how do I… series which I am posting as I familiarise myself with Microsoft Dynamics 365 Business Central.

There are a number of actions available in Power Automate for Business Central which allow specific actions against the data of Business Central to be performed from within Power Automate.

The 4th action which is available is the Find one record (V3) one which will allow you to search for and return a single record. Previously, if you didn’t have the row Id you needed to use Find recods V3 to search for the records, although you could add a top 1 to limit the return, you still had to manage the return as if there were multiple records; as of the 2024 Wave 1 release, this Find one record V3 action has been made available; the returned data is much simpler to handle, being more along the lines of that returned by the Get record V3 action.

Within a flow, click the add action button; search for Business Central and select the Business Central icon (make sure you select the SaaS one, which is a dark colour instead of the on-premises one which is mainly white):

Choose an action dialog with Business Central in the search results

Continue reading “In Microsoft Dynamics 365 Business Central (Power Automate Actions), how do I… Use the “Find One record V3” Action”

In Microsoft Dynamics 365 Business Central (Power Automate Actions), how do I… Use the “Find records V3” Action

Microsoft Dynamics 365 Business CentralThis article is part of the In Microsoft Dynamics 365 Business Central (Power Automate Actions), how do I… series, a sub-series of the In Microsoft Dynamics 365 Business Central (Power Automate), how do I… series and of the wider In Microsoft Dynamics 365 Business Central, how do I… series which I am posting as I familiarise myself with Microsoft Dynamics 365 Business Central.

There are a number of actions available in Power Automate for Business Central which allow specific actions against the data of Business Central to be performed from within Power Automate.

The third action which is available is the Find records (V3) one which allows you to select and return multiple records; this can be useful for processing multiple customers or vendors and/or selecting multiple documents.

Within a flow, click the add action button; search for Business Central and select the Business Central icon (make sure you select the SaaS one, which is a dark colour instead of the on-premises one which is mainly white):

Choose an action dialog with Business Central in the search results

Continue reading “In Microsoft Dynamics 365 Business Central (Power Automate Actions), how do I… Use the “Find records V3” Action”

MADIC dynamics Knowledge Hub Webinar on Tuesday 17th September 2024: How to Create a Multi-Company Report in Jet Reports

MADIC dynamicsHere at MADIC dynamics we will be presenting a Knowledge Hub Webinar at 1400 UK time on Tuesday next week.

Learn how to use Jet Reports to create a multicompany report from Microsoft Dynamics 365 Business Central. This session will cover the steps to consolidate data from multiple companies into a single report.

The webinar is open to everyone who wants to sign up and join:

No sep-2024 events found.

Working with Power Automate: Calculate 30 Days Ago

Power AutomateThis article is part of the Working with Power Automate series I am writing on my experiences working with the Power Automate, which is part of the Power Platform from Microsoft. I also have a related series of articles on Power Automate with Microsoft Dynamics 365 BC.

I was working on a flow a while ago and was using the Microsoft Dynamics 365 Business Central “Find record V3” action and needed to select invoices posted over 30 days ago. To do this I needed to calculate the date 30 days before the present date.

I did some digging and found the required function, which, somewhat counter-intuitively, is called addDays:

Expression showing the entered function to calculate 30 days ago

The function requires three parameters:

  1. timestamp – date to base the calculation on; I used the function utcNow() to get current date/time.
  2. days – the number of days to add or, if a negative number, the number of days to subtract
  3. format – format for the date, which I always use the ISO date format for as this ensures that both UK and US date systens will correctly compare (UK uses dd-MM-yyyy whereas the US uses MM-dd-yyyy).
addDays(utcNow(), -30, 'yyyy-MM-dd')

The expression returns the current date minus 30 allowing me to use this in the filter to only selected invoices older than this date.

Working with Power Automate

In the “For a selected Record V3” Microsoft Dynamics 365 Business Central Trigger in Power Automate, the Record URL is Avalable Without Using “Get url V3” Action

Microsoft Dynamics 365 Business CentralI am writing a few related series at the moment, includong In Microsoft Dynamics 365 Business Central (Power Automate Actions), how do I… which is a sub-series of the In Microsoft Dynamics 365 Business Central (Power Automate), how do I… series and of the wider In Microsoft Dynamics 365 Business Central, how do I… series which I am posting as I familiarise myself with Microsoft Dynamics 365 Business Central.

Yesterday, I posted at article about using the Get url (V3) action, but realised after posting that the URL for the record from the trigger is available without using this action.

I’m not sure if this is new or if I’ve previously just missed that it was there. In the Dynamic content[/b] available to actions for the For a selected record (V3) trigger:

Get url v3 dynamic content showing the Web Client URL content

This means that for this trigger type, if you want a drill down to the record in the trigger, then you an just use this dynamic content instead of having to use the Get url V3 action.

In Microsoft Dynamics 365 Business Central, how do I…

In Microsoft Dynamics 365 Business Central (Power Automate), how do I…

Continue reading “In the “For a selected Record V3” Microsoft Dynamics 365 Business Central Trigger in Power Automate, the Record URL is Avalable Without Using “Get url V3” Action”

New Functionality In Microsoft Power Automate 2024 Wave 2: Scale Faster With Process Mining Thin Client App

Power AutomateThis post is part of the New Functionality In Microsoft Power Automate 2024 Wave 2 series in which I am taking a look at the new functionality introduced in Microsoft Power Automate 2024 Wave 2.

The 1st of the new functionality in the Process mining section is scale faster with Process Mining thin client app.

The current Power Automate Process Mining app requires you to download the process model to the client computer. This download puts specific requirements on the hardware resources on the client computer. To unblock your resources, you can use the Azure Process Intelligence Analytic Service instead. With this service, you can use a lightweight desktop app with a process intelligence engine without the need to download the process model. The functionality of the thin desktop application offers features that are identical to the previous full desktop app. This allows you to scale faster, it supports larger process models, and doesn’t put specific requirements on your computers.

Enabled for: Admins, makers, marketers, or analysts, automatically
Public Preview: Sep 2024
General Availability: Nov 2024

Feature Details

Process Intelligence Analytic Service offers analytical functions in the form of an Azure API. When the desktop application connects to Process Intelligence Analytic Service, you have access to the identical functionality as in the full Power Automate Process Mining desktop app.

With Power Automate Process Mining thin client app, there’s no need to:

  • Download the process model, which takes up your resources.
  • Fulfill special hardware requirements when working with large process models.
  • Install desktop application updates in case of analytical operation modifications.

Click to show/hide the New Functionality In Microsoft Power Automate 2024 Wave 2 Series Index