 This article is part of the Working with Power Automate Child Flows series and of the larger Working with Power Automate series I am writing on my experiences working with the Power Automate, which is part of the Power Platform from Microsoft. I also have a related series of articles on Power Automate with Microsoft Dynamics 365 BC.
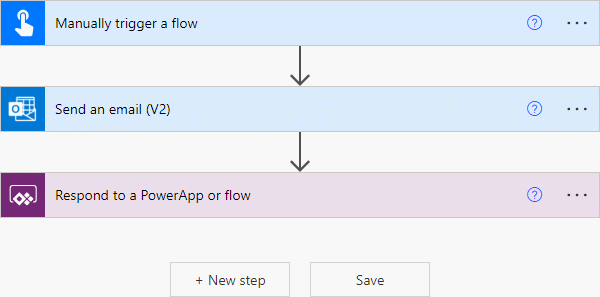
Child flows in Power Automate are quite easy to create and there is actually very little difference between creating a child flow and a normal flow; the main difference is actually in the final step of the child flow. In this example, I’m going to create a simple child flow, including a step to send an email, just to show a complete flow.
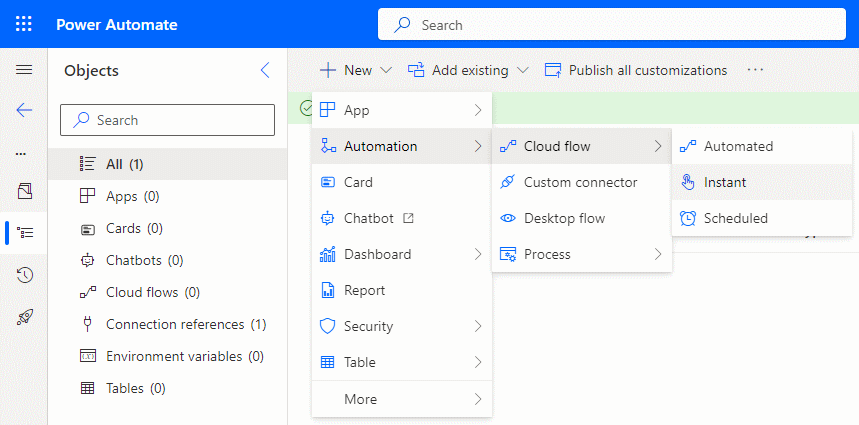
Child flows are created as instant cloud flows. To create a child flow, open your solution and click New » Automation » Cloud flow » Instant:
Enter a name for the flow (I have used a naming convention of Flow Type | Flow Name | Flow Version) and Choose how to trigger a flow by selecting Manually trigger a flow; click K to continue:

The first step is automatically created, into which we need to add some input variables, which will be passed from the parent; click Add an input:

Choose the type of input to create; I opted for a Text input type:

The Name and Prompt can be amended; I have named the variable in a way that I can recognise the variable as an input variable and what it will store (I will cover naming conventions in a future article):

Repeat the steps above to add any other input variables which are required.
The next step I have added for this example, is a step to email the message set into the input variable. Add a new action, and select the Send an email (V2) action; I have hardcoded the b]To and Subject fields, but could have set these in the parent flow and passed them into an input variable. For the email body, place the cursor in the field and in the Dynamic content opup, find the input variable you created and named in the first step; easily finding the input variables is why I give them a specific prefix, to differentiate them from any other variables. Click the input variable and it will appear in the email body at the cursor location:

You can enter text and select as many inout variables into the email action as required.
The final step required for the child flow, is particular to child flows. click the add button and select the Respond to a PowerApp or flow action:

The action will be added to the flow, where you have a similar ability to add output variables as you do in the initial step for adding input variables. I have added a single output variable containing a hardcoded string of text, but this could ave been set with one or more variables as well as some text:

With the respond action added, the child flow is now complete and (almost) ready to call from parent flows:
In the next article, of this series, I’ll show how the setting required for child flows is set.
Working with Power Automate
Working with Power Automate Child Flows
What should we write about next?
If there is a topic which fits the typical ones of this site, which you would like to see me write about, please use the form, below, to submit your idea.
3 thoughts on “Working with Power Automate Child Flows: Create a Child Flow”