Restoring the Quick Access in Windows 11 Explorer

WindowsI changed jobs last year which meant a new laptop to setup and configure as I need. I had most things configured as I wanted them when an update to Windows 11 came through and the quick access section in Explorer disappeared; this is a section to which you can pin folders to which you want quick access when using Windows Explorer.

It appears at the top of the left navigation pane, or used to appear there anyway. At first I thought Microsoft had removed it entirely, before realising that the options to add a folder to the quick access was still on the right click context menu, which was either a very sloppy change or evidence that the functionality was still present, albeit hidden:

Windows Explorer with the quick access section missing

Continue reading “Restoring the Quick Access in Windows 11 Explorer”

Create a Calculated Field in the Jet Reports Table Builder

Jet ReportsI’ve recently been creating some reports for a client using Jet Reports and data pulled from Microsoft Dynamics 365 Business Central. One of the requirements was to have a report which pulled out Intrastat related information in a specific format. As well as pulling out the standard information, they also wanted a calculation of the net weight for a sales order line, which mean linking from the Purch. Inv. Line (123) to the Item (27) table and multiplying the quantity by the net weight.

I initially tried to do this using a calculated field in the Excel PivotTable which was added on top of the data returned by Jet Reports, but quickly realised that the result wasn’t correct. This [prompted me to go back to the source data and see if I could perform the calculation using Jet Reports as it got the data rather than afterwards.

The report was being built using the Table Builder tool of Jet Reports; to add a calculated field in Table Builder, click the Add Formula button in the bottom left:

Table Builder with the Add Formula button ringed

Continue reading “Create a Calculated Field in the Jet Reports Table Builder”

Working with Power Automate: Best Practice For Using Scopes

Power AutomateThis article is part of the Working with Power Automate series I am writing on my experiences working with the Power Automate, which is part of the Power Platform from Microsoft. I also have a related series of articles on Power Automate with Microsoft Dynamics 365 BC.

Over the last couple of articles of this series, I’ve described scopes and shown how they are used.

That’s fine for the basics, but there are a few best practices I try to follow when I use them.

Not everything needs to be in a scope, so try to avoid going overboard. I would only add a scope when there are several related items, such as the document handling on OneDrive I showed in the example article I linked above.

Actions I would not put into a scope would include loops (called Apply to each in Power Automate) and calls to child flows (called Run a Child Flow) as well as the responses to a child flow.

Like all actions, I would recommend renaming the scope action to include a brief description of what the combined actions in the flow are doing and if more detail is required add a note, which is done by clicking the ellipsis button on the scope heading and clicking Add a note.

Working with Power Automate

Working with Power Automate
What is Power Automate?
What Type of Flow Are Available?
What Type of Cloud Flows Are Available?
Power Automate with Business Central
Working with Power Automate Solutions: What Are Solutions?
Working with Power Automate Solutions: What Types of Solution Are There?
Working with Power Automate Solutions: What is a Solution Publisher?
Working with Power Automate Solutions: Create a Solution Publisher
Working with Power Automate Solutions: Create a Solution
Working with Power Automate Solutions: Publish a Solution
Working with Power Automate Solutions: Version Numbering for Solutions
Working with Power Automate Solutions: Exporting An Unmanaged Solution
Working with Power Automate Solutions: Importing An Unmanaged Solution
Working with Power Automate Solutions: Exporting A Managed Solution
Working with Power Automate Solutions: Importing A Managed Solution
Working with Power Automate Solutions: Change the Managed Properties of a Solution Component
Create a Visio Diagram of a Flow
What Are Environment Variables and Why Should They be Used?
Create an Environment Variable
Create a New Cloud Flow From a Template
Managing Large Flows
What is a Scope?
Example of How to Use a Scope
Best Practice For Using Scopes
Working with Power Automate Child Flows: What are Child Flows?
Working with Power Automate Child Flows: Create a Child Flow
Working with Power Automate Child Flows: Change Run Only Users For Child Flow
Working with Power Automate Child Flows: Add a Child Flow To a Parent Flow
Working with Power Automate Child Flows: Test the Parent/Child Flow Examples
Working with Power Automate Child Flows: Error Encountered Saving a Flow Which Calls a Child Flow
Working with Power Automate Child Flows: Error Encountered With Surprise Extra Parameters for a Child Flow
Calculate 30 Days Ago

Add Calculated Field to PivotTable in Microsoft Excel

Microsoft OfficeClients often think that I know more Excel than I do, because I know how to use some functions such as IF, CONCAT and more, but my knowledge of Excel is quite limited when it comes to charts, graphs and PivotTables. I was recently writing a report for a client using Jet Reports to pull Intrastat information from Microsoft Dynamics 365 Business Central (both Jet and Business Central are irrelevant as far as the detail fo this post are concerned).

One of the things I wanted to do was create a summary of the data pulled from Business Central, which meant using a standard Excel PivotTable, something with which I have almost no experience. I managed to get most of the PivotTable configured without issue, but I needed to perform a calculation within the PivotTable and it took me a while to work out.

This is done by adding a calculated field through the PivotTable Analyze tab on the action bar; click the Fields, Items & Sets » Calculated Field button:

Excel showing the Calculated Field button on the PivotTable Analyze tab

Continue reading “Add Calculated Field to PivotTable in Microsoft Excel”

Working with Power Automate: Example of How to Use a Scope

Power AutomateThis article is part of the Working with Power Automate series I am writing on my experiences working with the Power Automate, which is part of the Power Platform from Microsoft. I also have a related series of articles on Power Automate with Microsoft Dynamics 365 BC.

In the previous article of this series, I explained what a scope in Power Automate was and what it did; in this post I am going to show an example of a scope.

This example is within a flow created to perform various tasks, one of this is to create a mail merge document and convert it to a PDF document, which is performed over a number of actions; in the below diagram, these are the actions after the condition and before the append variable one:

Power Automate example showing the steps

Continue reading “Working with Power Automate: Example of How to Use a Scope”

New Functionality In Microsoft Dynamics 365 Business Central 2024 Wave 1: Share Error Details to Get Help from Another User

Microsoft Dynamics 365 Business CentralThis post is part of the New Functionality In Microsoft Dynamics 365 Business Central 2024 Wave 1 series in which I am taking a look at the new functionality introduced in Microsoft Dynamics 365 Business Central 2024 Wave 1.

The 3rd of the new functionality in the User experiences section is share error details to get help from another user.

By facilitating collaboration and knowledge sharing, Microsoft are enabling teams to work together more effectively and efficiently. You can leverage the expertise of colleagues or subject matter experts to overcome obstacles and minimize downtime. The ability to share error details in Business Central enhances collaboration and problem-solving capabilities.

Enabled for: Users, automatically
Public Preview: Mar 2024
General Availability: Apr 2024

Feature Details

When you’re blocked by an error, you can quickly and easily share the error details with colleagues, subject matter experts, or other users to get assistance. The details include the exact error message, error code, and other information that’s helpful when troubleshooting an error. By sharing the error details, you can effectively communicate the specific issue you’re facing, which helps your colleagues provide targeted support and guidance.

Shows new share details menu on inline validation error message

Continue reading “New Functionality In Microsoft Dynamics 365 Business Central 2024 Wave 1: Share Error Details to Get Help from Another User”

Disable the Edge Outlook Pane

MicrosoftThe new work laptop came with Windows 11 installed and the Edge browser as the default. While I don’t especially mind the browser being the default, there ewas one thing which I found a little annoying; if you opened an attachment from an email, an Outlook pane opened on the right side of the browser:

Edge browser with Outlook pane open

Continue reading “Disable the Edge Outlook Pane”

New Functionality In Microsoft Dynamics 365 Business Central 2024 Wave 1: Use Actions to Navigate and Highlight or Fix Platform-Generated Errors

Microsoft Dynamics 365 Business CentralThis post is part of the New Functionality In Microsoft Dynamics 365 Business Central 2024 Wave 1 series in which I am taking a look at the new functionality introduced in Microsoft Dynamics 365 Business Central 2024 Wave 1.

The 2nd of the new functionality in the User experiences section is use actions to navigate and highlight or fix platform-generated errors.

Microsoft are making it easier for you to help yourself when something goes wrong in Business Central. Error messages provide actions that take you to the page, or even a specific field on a page, so you can quickly resolve the issue. The actions provide value to organizations by enhancing productivity and ensuring smooth workflows.

Enabled for: Users, automatically
Public Preview: Mar 2024
General Availability: Apr 2024

Feature Details

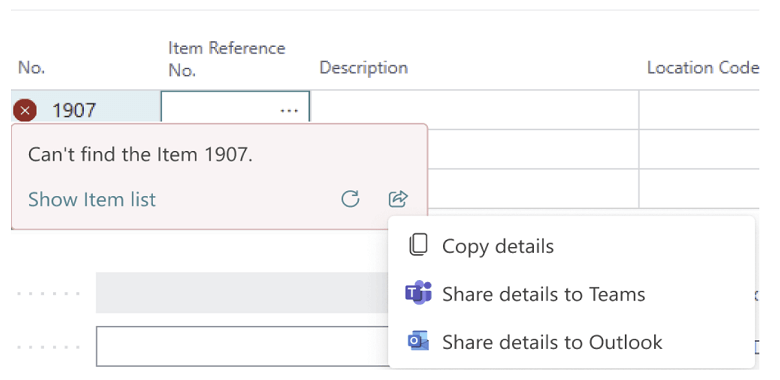
Microsoft have enhanced the user experience by making it easier to understand, go to, and resolve errors that come from the platform. Previously, when an error occurred, you had to manually go to the relevant page or area to address the issue.

The error messages that the Business Central platform generates are now easier to read and understand because they no longer contain field names. However, messages still contain the full technical details, including field names, in the Detailed error message section. Select the Copy details icon on inline validation errors or in an error message to access the technical information.

Continue reading “New Functionality In Microsoft Dynamics 365 Business Central 2024 Wave 1: Use Actions to Navigate and Highlight or Fix Platform-Generated Errors”
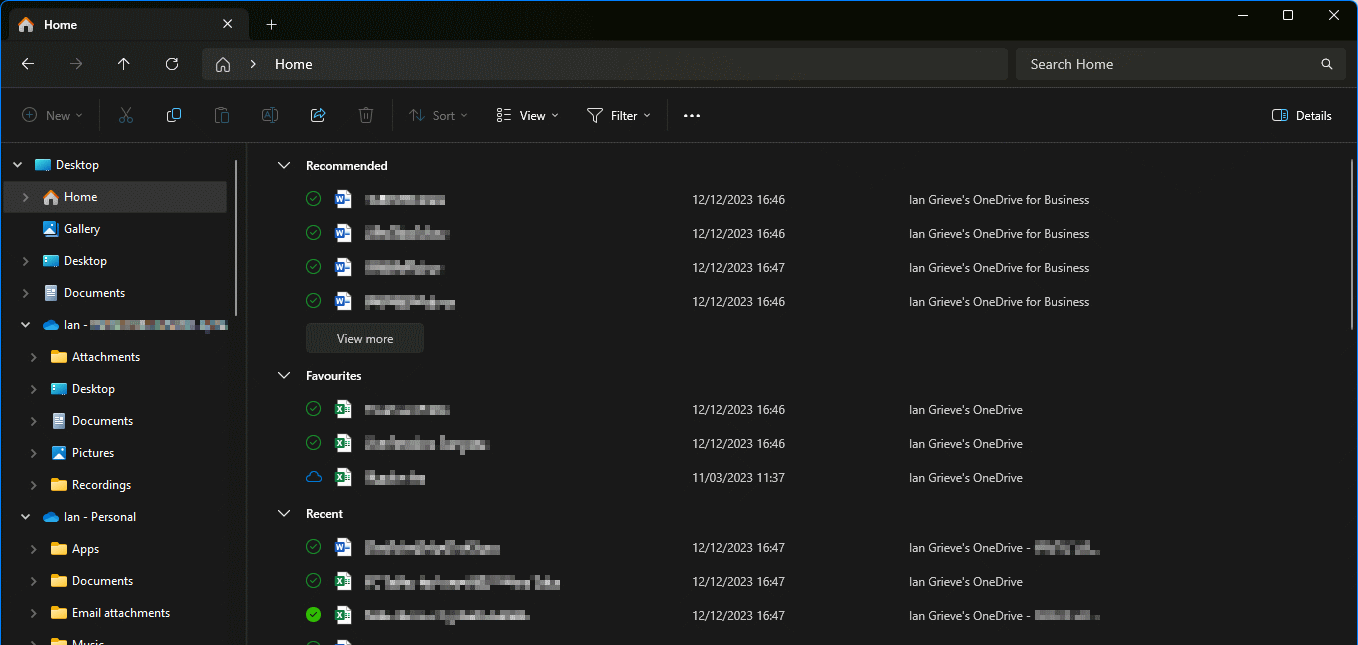
New Functionality In Microsoft Dynamics 365 Business Central 2024 Wave 1: Use Drag and Drop to Attach Multiple Files

Microsoft Dynamics 365 Business CentralThis post is part of the New Functionality In Microsoft Dynamics 365 Business Central 2024 Wave 1 series in which I am taking a look at the new functionality introduced in Microsoft Dynamics 365 Business Central 2024 Wave 1.

The 1st of the new functionality in the User experiences section is use drag and drop to attach multiple files.

Drag and drop functionality to attach multiple files to Business Central records makes it easier to manage files. This feature benefits users who work with multiple files, and adds value to organizations by enhancing data organization and accessibility.

Enabled for: Users, automatically
Public Preview: Mar 2024
General Availability: Apr 2024

Feature Details

You can conveniently drag multiple files at the same time to attach them to records in Business Central. Select multiple files, and then just drag them to the drop targets.

This improvement is particularly beneficial if you often work with multiple files and need to associate them with a specific record. The ability to attach several files at the same time eliminates the need to manually upload files one-by-one, which provides a more efficient and user-friendly experience.

Drag and drop file capability on prompt dialog

My Opinion

despite knowing it doesn’t work, I keep on trying to drag and drop multiple files, so it will be good to see this finally work.

Click to show/hide the New Functionality In Microsoft Dynamics 365 Business Central 2024 Wave 1 Series Index

New Functionality In Microsoft Dynamics 365 Business Central 2024 Wave 1
Use Virtual Tables to Expose More Business Central Data in Dataverse
Improve Approval Processes via Power Automate
Add Table and Field Mappings for Existing Integration Tables
Find a Matching Record in a Power Automate Flow
Archive Projects
Usability Improves for Service and Projects
Use Deferral Codes in Purchase and Sales Journals
Define a Service Invoice Posting Policy for Various Users
Define Default Location for Project or Project Phase
Block Item, Item Variant or Service Item from Use in Service Management transactions
Connect Business Central With Shopify B2B
Set Up Financial Consolidation Runs More Efficiently
Simpler Shopify Connection
Use General Ledger Account Revaluation for More Accurate Financial Statements
Get More Productive While Entering Time Sheets
Create Projects That You Can Invoice to Multiple Customers
Assemble to Project
Invoice a Customer for Multiple Projects
Use New Excel Layouts for 35 Selected Reports
Use Standard Terminology for Project Management
Use Currencies When Posting Employee Transactions
Manage Work Orders in Field Service, Invoice Them in Business Central
Manage Document Attachments in Service Items and Documents
Export and Import Multiline Text Using Configuration Packages
Correct Errors in Service Invoices
Prevent Editing Number Series on Service Documents and Cards
Be More Productive When Approving Time Sheets
Inventory Package Numbers Work Like Item Tracking Dimensions
Assign Salesperson to Customer Ship-to Addresses
View Incoming Documents in Archived Quotes and Orders
Specify Dimensions on Posted Entries Applications With Realized Gains or Losses
Allow Lines with Amounts of Zero on Recurring General Journals
Automate the Reminders Process in Collections
See Improved Usability for Warehouse and Inventory
Ensure Accurate Inventory Valuation by Controlling Cost Adjustment
Use a New Role Center for Collection Management
Manage Subscription Billing and Revenue and Expense Recognition
Enable Sustainability Features for Integrations with APIs
Install Field Service Integration with Business Central from AppSource
Introduce Power Automate Copilot Integration with Business Central
Map e-Documents to Purchase Order Lines with Copilot
Create Sales Lines Easily with Copilot
Extend Copilot Using Richer Development Tools
Get to Insights Faster with Copilot-Generated Analysis Tabs
Complete Bank Account Reconciliation Faster With Copilot
Create Product Information Faster with Copilot
Learn More About Fields with Copilot
Chat with Copilot
Simplify collections with Copilot for Finance and Business Central
Automate Tests for your Copilot Extensions with the Business Central Test Toolkit
Automate IRS 1099 Form Submission in US
Enable Additional Countries and Regions
Install UK Localization as an App
Process Czech Bank Statements, Payment Orders More Productively
Improvement of Czech Localization Reports
Report Explorer has Additional Outputs in the Czech Version
Improved Updates of ARES Data in the Czech Version
Allow More Extendability of Advance Payments in the Czech Version
Print QR Codes on Sales Invoices in the Czech Version
Use Excel Layouts for Czech Reports
Handle Multiple File Uploads and File Drop Zones
Debug the System Application
Remove Friction When Working with External App Dependencies
Use In-client Page Scripting Tool for Acceptance Testing
Use AL-controlled Barcode Scanning For All Scenarios
Write flexible and performant code with NumberSequences
Use the OData V4 IN Operator in Web Service Queries
Define Extension Objects in Same App as Their Base Object
Use Cookies in HTTP Calls From Business Central
Define Tooltips on Table Fields
Use Linked Environment in Dataverse Integration
Audit Business Central Operations in Microsoft Purview
Encrypt Data At-Rest with Customer-Managed Encryption Key
Allow Customers to Consent to Microsoft Support Accessing Their Data
Link Business Central Environments to Power Platform Environments
Copy Companies with Dataverse Integration Safely
View and Filter Users With Additional User Details
Control partner access per environment
Analyze Telemetry Events Across Browser and Server for a Session or User
Use Premium License to Sign In to Environment with Essentials Licenses
Experience the New Embedded AppSource Marketplace Page
Migrate Record Links and Notes with Cloud Migration Tooling
See VAT Date in Posting Previews
Automate Country of Origin Listed for Item Tracking Code in Intrastat Reporting
Achieve Sustainable Compliance with Business Central
Discover Report and Data Analysis Content Easily
Use Drag and Drop to Attach Multiple Files
Use Actions to Navigate and Highlight or Fix Platform-Generated Errors
Share Error Details to Get Help from Another User
Access Worksheet Pages from Mobile Phones
Boost Productivity With the Modern Action Bar
Enhancements to the User Experience

Working with Power Automate: What is a Scope?

Power AutomateThis article is part of the Working with Power Automate series I am writing on my experiences working with the Power Automate, which is part of the Power Platform from Microsoft. I also have a related series of articles on Power Automate with Microsoft Dynamics 365 BC.

I briefly introduced scopes in the last article of this series and thought I’d give a bit more detail on what scopes are and how they’re used.

Scopes in Power Automate are a type of action, but one which doesn’t do anything by itself.

Instead scopes are used to organise a flow, allowing you to group together related actions. As actions can be expanded and contracted, a scope allows you to control which scopes are expanded and the steps visible or not, making the view smaller when you close the scopes you’re not working on.

Scopes, like all actions, can be renamed so that they have a name which makes it clean what that action does; in terms of a scope, the scope name should clearly describe what the actions in the scope collectively do. For example, you might have a scope renamed to “Scope | Handle customer document on OneDrive”.

In addition, scopes can also be used to improve error handling (a topic I haven’t yet covered).Each action can have error handling attached to it for the result of that step, or, in the case of a scope, error handling for all the actions within the scope.

Working with Power Automate

Working with Power Automate
What is Power Automate?
What Type of Flow Are Available?
What Type of Cloud Flows Are Available?
Power Automate with Business Central
Working with Power Automate Solutions: What Are Solutions?
Working with Power Automate Solutions: What Types of Solution Are There?
Working with Power Automate Solutions: What is a Solution Publisher?
Working with Power Automate Solutions: Create a Solution Publisher
Working with Power Automate Solutions: Create a Solution
Working with Power Automate Solutions: Publish a Solution
Working with Power Automate Solutions: Version Numbering for Solutions
Working with Power Automate Solutions: Exporting An Unmanaged Solution
Working with Power Automate Solutions: Importing An Unmanaged Solution
Working with Power Automate Solutions: Exporting A Managed Solution
Working with Power Automate Solutions: Importing A Managed Solution
Working with Power Automate Solutions: Change the Managed Properties of a Solution Component
Create a Visio Diagram of a Flow
What Are Environment Variables and Why Should They be Used?
Create an Environment Variable
Create a New Cloud Flow From a Template
Managing Large Flows
What is a Scope?
Example of How to Use a Scope
Best Practice For Using Scopes
Working with Power Automate Child Flows: What are Child Flows?
Working with Power Automate Child Flows: Create a Child Flow
Working with Power Automate Child Flows: Change Run Only Users For Child Flow
Working with Power Automate Child Flows: Add a Child Flow To a Parent Flow
Working with Power Automate Child Flows: Test the Parent/Child Flow Examples
Working with Power Automate Child Flows: Error Encountered Saving a Flow Which Calls a Child Flow
Working with Power Automate Child Flows: Error Encountered With Surprise Extra Parameters for a Child Flow
Calculate 30 Days Ago