New Functionality In Microsoft Dynamics 365 Business Central 2024 Wave 1: Assign Salesperson to Customer Ship-to Addresses

Microsoft Dynamics 365 Business CentralThis post is part of the New Functionality In Microsoft Dynamics 365 Business Central 2024 Wave 1 series in which I am taking a look at the new functionality introduced in Microsoft Dynamics 365 Business Central 2024 Wave 1.

The 25th of the new functionality in the Application section is assign salesperson to customer ship-to addresses.

Assign salespeople to the shipping location rather than the billing address to ensure accurate sales reports by reflecting the true geographical distribution of your sales. Assigning a salesperson to a customer’s ship-to address gives you more precise insights, optimizes resource allocation, and drives strategic growth in your business.

Enabled for: Users, automatically
Public Preview: Mar 2024
General Availability: Apr 2024

Feature Details

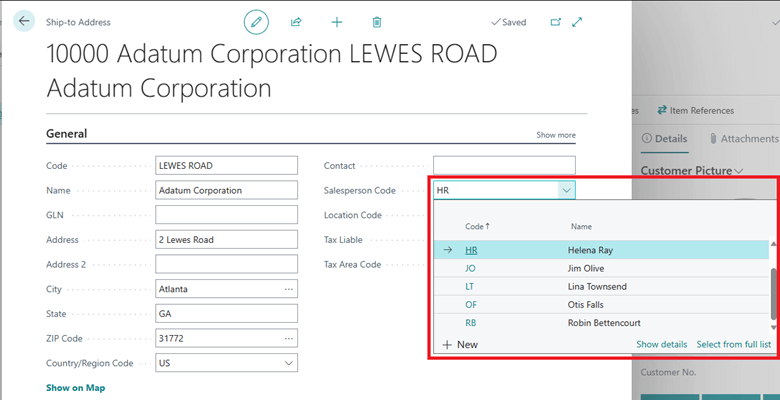
You can assign a salesperson on the Customer card page by choosing Customer, and then Ship-To Addresses to open the Ship-to Addresses List page. Choose Manage, and then Edit to open the Ship-to Address card page. Enter or choose a Salesperson Code to select the salesperson who is responsible for the customer’s ship-to address.

Shows Ship-To Address page with Salesperson code field highlighted

Continue reading “New Functionality In Microsoft Dynamics 365 Business Central 2024 Wave 1: Assign Salesperson to Customer Ship-to Addresses”

New Functionality In Microsoft Dynamics 365 Business Central 2024 Wave 1: Inventory Package Numbers Work Like Item Tracking Dimensions

Microsoft Dynamics 365 Business CentralThis post is part of the New Functionality In Microsoft Dynamics 365 Business Central 2024 Wave 1 series in which I am taking a look at the new functionality introduced in Microsoft Dynamics 365 Business Central 2024 Wave 1.

The 24th of the new functionality in the Application section is inventory package numbers work like item tracking dimensions.

This update addresses a gap that was present when the feature was originally introduced, and unlocks physical inventory orders for companies that use package-specific tracking.

Enabled for: Users by admins, makers, or analysts
Public Preview: Mar 2024
General Availability: Apr 2024

Feature Details

To start using this feature, you must activate Feature Update: Enable use of package tracking in physical inventory orders on the Feature Management page. Existing physical inventory orders will be updated, however, Business Central can’t populate the Package no. field. You must recreate these lines using the Calculate Lines action on the Phys. Inventory Order page.

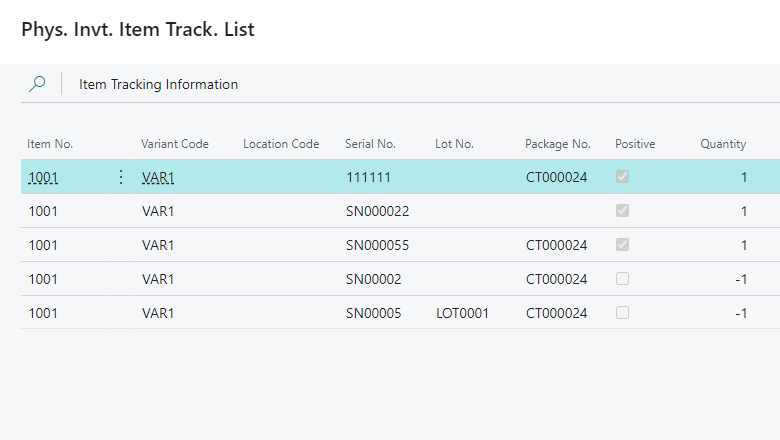
You can enter the package number for items where package tracking is needed on the Phys. Inventory Recording Lines page. Choose Finish to finalize recording.

After you choose Finish in the Physical Inventory Order, Business Central will calculate differences with respect to the package and other item tracking details, and will make positive or negative adjustments.

Physical Inventory - Item Tracking

Click to show/hide the New Functionality In Microsoft Dynamics 365 Business Central 2024 Wave 1 Series Index

New Functionality In Microsoft Dynamics 365 Business Central 2024 Wave 1
Use Virtual Tables to Expose More Business Central Data in Dataverse
Improve Approval Processes via Power Automate
Add Table and Field Mappings for Existing Integration Tables
Find a Matching Record in a Power Automate Flow
Archive Projects
Usability Improves for Service and Projects
Use Deferral Codes in Purchase and Sales Journals
Define a Service Invoice Posting Policy for Various Users
Define Default Location for Project or Project Phase
Block Item, Item Variant or Service Item from Use in Service Management transactions
Connect Business Central With Shopify B2B
Set Up Financial Consolidation Runs More Efficiently
Simpler Shopify Connection
Use General Ledger Account Revaluation for More Accurate Financial Statements
Get More Productive While Entering Time Sheets
Create Projects That You Can Invoice to Multiple Customers
Assemble to Project
Invoice a Customer for Multiple Projects
Use New Excel Layouts for 35 Selected Reports
Use Standard Terminology for Project Management
Use Currencies When Posting Employee Transactions
Manage Work Orders in Field Service, Invoice Them in Business Central
Manage Document Attachments in Service Items and Documents
Export and Import Multiline Text Using Configuration Packages
Correct Errors in Service Invoices
Prevent Editing Number Series on Service Documents and Cards
Be More Productive When Approving Time Sheets
Inventory Package Numbers Work Like Item Tracking Dimensions
Assign Salesperson to Customer Ship-to Addresses
View Incoming Documents in Archived Quotes and Orders
Specify Dimensions on Posted Entries Applications With Realized Gains or Losses
Allow Lines with Amounts of Zero on Recurring General Journals
Automate the Reminders Process in Collections
See Improved Usability for Warehouse and Inventory
Ensure Accurate Inventory Valuation by Controlling Cost Adjustment
Use a New Role Center for Collection Management
Manage Subscription Billing and Revenue and Expense Recognition
Enable Sustainability Features for Integrations with APIs
Install Field Service Integration with Business Central from AppSource
Introduce Power Automate Copilot Integration with Business Central
Map e-Documents to Purchase Order Lines with Copilot
Create Sales Lines Easily with Copilot
Extend Copilot Using Richer Development Tools
Get to Insights Faster with Copilot-Generated Analysis Tabs
Complete Bank Account Reconciliation Faster With Copilot
Create Product Information Faster with Copilot
Learn More About Fields with Copilot
Chat with Copilot
Simplify collections with Copilot for Finance and Business Central
Automate Tests for your Copilot Extensions with the Business Central Test Toolkit
Automate IRS 1099 Form Submission in US
Enable Additional Countries and Regions
Install UK Localization as an App
Process Czech Bank Statements, Payment Orders More Productively
Improvement of Czech Localization Reports
Report Explorer has Additional Outputs in the Czech Version
Improved Updates of ARES Data in the Czech Version
Allow More Extendability of Advance Payments in the Czech Version
Print QR Codes on Sales Invoices in the Czech Version
Use Excel Layouts for Czech Reports
Handle Multiple File Uploads and File Drop Zones
Debug the System Application
Remove Friction When Working with External App Dependencies
Use In-client Page Scripting Tool for Acceptance Testing
Use AL-controlled Barcode Scanning For All Scenarios
Write flexible and performant code with NumberSequences
Use the OData V4 IN Operator in Web Service Queries
Define Extension Objects in Same App as Their Base Object
Use Cookies in HTTP Calls From Business Central
Define Tooltips on Table Fields
Use Linked Environment in Dataverse Integration
Audit Business Central Operations in Microsoft Purview
Encrypt Data At-Rest with Customer-Managed Encryption Key
Allow Customers to Consent to Microsoft Support Accessing Their Data
Link Business Central Environments to Power Platform Environments
Copy Companies with Dataverse Integration Safely
View and Filter Users With Additional User Details
Control partner access per environment
Analyze Telemetry Events Across Browser and Server for a Session or User
Use Premium License to Sign In to Environment with Essentials Licenses
Experience the New Embedded AppSource Marketplace Page
Migrate Record Links and Notes with Cloud Migration Tooling
See VAT Date in Posting Previews
Automate Country of Origin Listed for Item Tracking Code in Intrastat Reporting
Achieve Sustainable Compliance with Business Central
Discover Report and Data Analysis Content Easily
Use Drag and Drop to Attach Multiple Files
Use Actions to Navigate and Highlight or Fix Platform-Generated Errors
Share Error Details to Get Help from Another User
Access Worksheet Pages from Mobile Phones
Boost Productivity With the Modern Action Bar
Enhancements to the User Experience

Working with Power Automate Child Flows: Create a Child Flow

Power AutomateThis article is part of the Working with Power Automate Child Flows series and of the larger Working with Power Automate series I am writing on my experiences working with the Power Automate, which is part of the Power Platform from Microsoft. I also have a related series of articles on Power Automate with Microsoft Dynamics 365 BC.

Child flows in Power Automate are quite easy to create and there is actually very little difference between creating a child flow and a normal flow; the main difference is actually in the final step of the child flow. In this example, I’m going to create a simple child flow, including a step to send an email, just to show a complete flow.

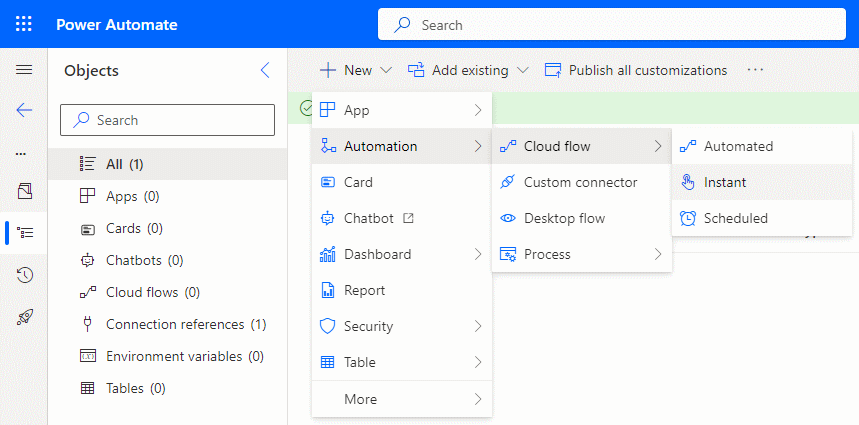
Child flows are created as instant cloud flows. To create a child flow, open your solution and click New » Automation » Cloud flow » Instant:

Power Automate Solution page with the menu open to create a new Instant cloud flow

Continue reading “Working with Power Automate Child Flows: Create a Child Flow”