Change Text in Stored Procedure on Microsoft SQL Server

Microsoft SQL ServerI did some work for a client recently creating a script which they could run after copying their live Microsoft Dynamics GP system to a development server. This script did a variety of tasks, one of which was to change the folder location to which Post Master Enterprise was exporting a generated SSRS report as a PDF; this path was embedded within a stored procedure.

I’ve previously written a SQL script which updated SQL views. I was able to use that script as the basis for this one which replaces text within a specific stored procedure.

The first highlighted section is the path on the live server, the second the path on the dev server and the third is the name of the stored procedure to be updated:

/*
Created by Ian Grieve of azurecurve | Ramblings of an IT Professional (http://www.azurecurve.co.uk) This code is licensed under the Creative Commons Attribution-NonCommercial-ShareAlike 4.0 International (CC BY-NC-SA 4.0 Int). */
DECLARE @SprocDefinition AS NVARCHAR(max) SELECT @SprocDefinition = REPLACE( REPLACE(['SQL Modules'].definition, 'CREATE PROC', 'ALTER PROC') ,'\\SQL01\Dynamics Central\CompanyA\Invoices\','\\SQL02\Dynamics Central\CompanyA\Invoices\') FROM sys.all_objects AS ['All Objects'] LEFT JOIN sys.sql_modules AS ['SQL Modules'] ON ['SQL Modules'].object_id = ['All Objects'].object_id WHERE ['All Objects'].name = 'zDP_ESS80000_PostSSRS' EXEC (@SprocDefinition) GO

Adventures With A Raspberry Pi: Check Version of OS on Raspberry Pi

Raspberry PiThis post is part of the Adventures with a Raspberry Pi series.

When I was researching upgrading the Raspberry Pi, the consensus seemed to be that the OS should be upgraded one version at a time. This means that to do the upgrade, you need to know the exact version of the OS you’re using.

There is a command you can run on the Raspberry Pi which will return details of the OS:

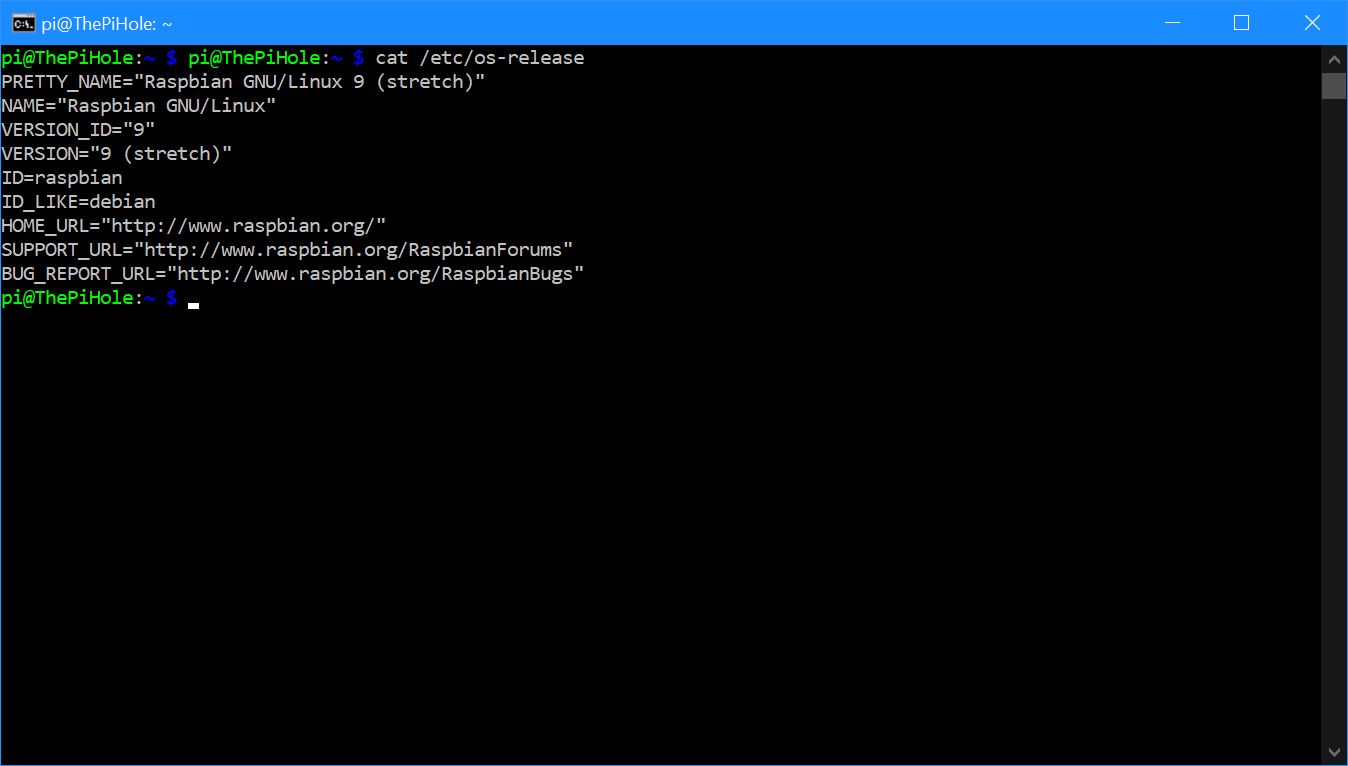
cat /etc/os-release

As the screenshot below shows, there is a number of pieces of information returned; in terms of the OS the important line is the VERSION one:

Data on the installed OS

Adventures With A Raspberry Pi

Adventures With A Raspberry Pi
Building The Raspberry Pi: CanaKit Raspberry Pi 3 B+ Complete Starter Kit
Building The Raspberry Pi: Raspberry Pi Build
Building The Raspberry Pi: Install Operating System
Building The Raspberry Pi: First Run
Building The Raspberry Pi: System Configuration Tool
Building The Raspberry Pi: Enable SSH For Remote Access
Building The Raspberry Pi: Securing the Raspberry Pi
Building The Raspberry Pi: Conclusion
Installing Pi-hole On A Raspberry Pi: What is Pi-hole?
Installing Pi-hole On A Raspberry Pi: Install Pi-hole
Installing Pi-hole On A Raspberry Pi: Change Pi-hole Admin Password
Installing Pi-hole On A Raspberry Pi: Configure Network to use Pi-hole
Using Pi-hole On A Raspberry Pi: Blocked Adverts
Using Pi-hole On A Raspberry Pi: Admin Interface
Using Pi-hole On A Raspberry Pi: Disabling Pi-hole
Using Pi-hole On A Raspberry Pi: Whitelisting a Site
Using Pi-hole On A Raspberry Pi: Update Blocklists
Using Pi-hole On A Raspberry Pi: Maintain Blocklists
Using Pi-hole On A Raspberry Pi: Change DNS Servers
Using Pi-hole On A Raspberry Pi: Connecting With SSH
Using Pi-hole On A Raspberry Pi: Updating the Pi-hole
Using Pi-hole On A Raspberry Pi: Conclusion
What Else Can I Use It For?
Prepare New SD Card For Raspberry Pi OS: Download SD Card Formatter
Prepare New SD Card For Raspberry Pi OS: Install SD Card Formatter
Prepare New SD Card For Raspberry Pi OS: Format SD Card
Prepare New SD Card For Raspberry Pi OS: Download NOOBS
Prepare New SD Card For Raspberry Pi OS: Copy Files To The SD Card
Prepare New SD Card For Raspberry Pi OS: Conclusion
Installing Pi-hole On A Raspberry Pi: Changing the IP Address
Raspberry PI Update Fails
Check Version of OS on Raspberry Pi
How to Update the OS on a Raspberry Pi

Adventures With A Raspberry Pi: Raspberry PI Update Fails

Raspberry PiThis post is part of the Adventures with a Raspberry Pi series. I always intended for this to be a long running series, but it’s been quite a while since I did anything with the Pi. I bought one initially to use as a Pi-hole which I have been using ever since although this usually just goes as far as applying updates or whitelisting a site.

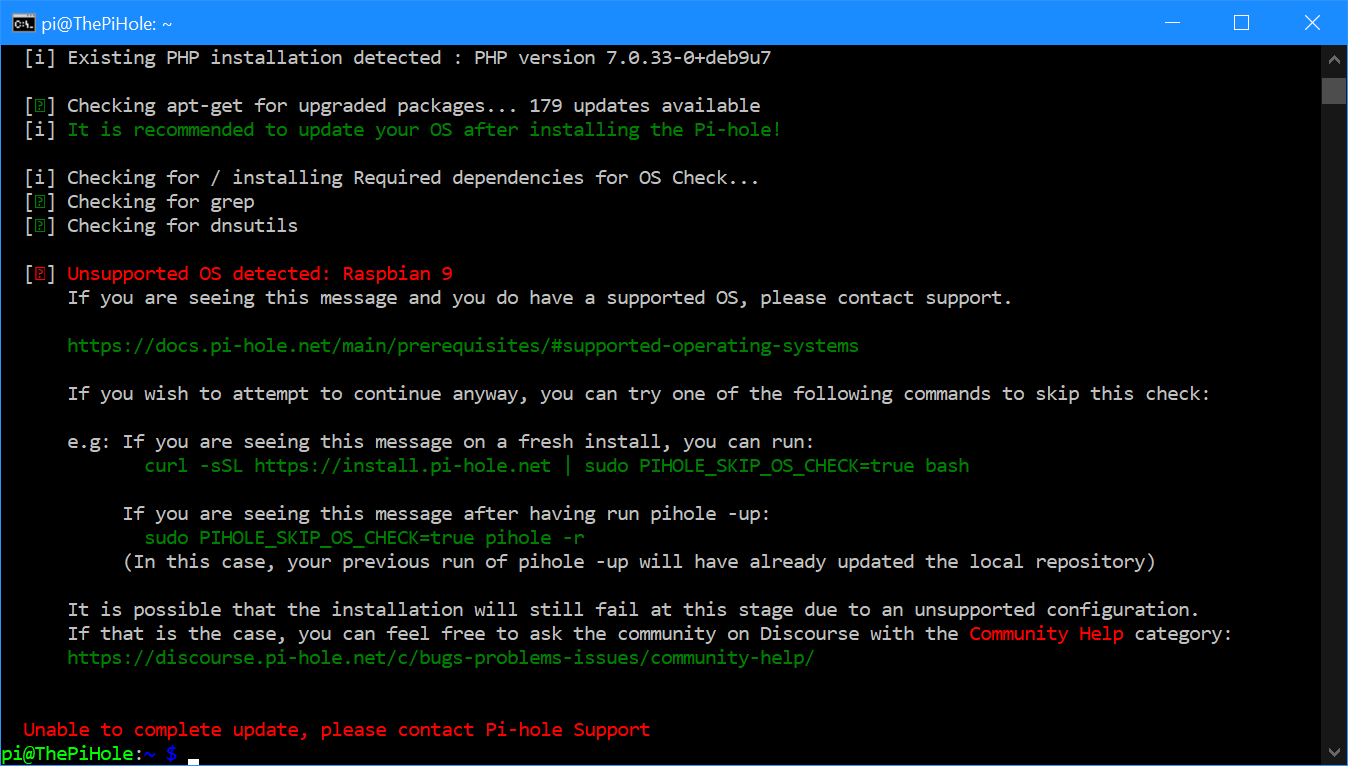
There was recently a pending update which I tried to apply, but the update failed saying that an unsupported OS was detected:

Unsupported OS detected

Continue reading “Adventures With A Raspberry Pi: Raspberry PI Update Fails”

In Microsoft Dynamics 365 Business Central, how do I… Change the User Experience in a Company from “Essentials” to “Premium”

Microsoft Dynamics 365 Business CentralThis post is part of the In Microsoft Dynamics 365 Business Central (Administration), how do I… series and of the wider In Microsoft Dynamics 365 Business Central, how do I… series which I am posting as I familiarise myself with Microsoft Dynamics 365 Business Central.

When you create a company with the advanced evaluation with complete sample data, you also need to change the user experience for the new company from Essential to Premium.

To do this, click the Settings cog icon and then click on Company Information:

Dynamics BC homepage wth Settings pane open

Continue reading “In Microsoft Dynamics 365 Business Central, how do I… Change the User Experience in a Company from “Essentials” to “Premium””

Create a Database Role to Grant Access to Views for Reporting

Microsoft SQL ServerToo many times as a consultant I have discovered that users have been grant full access to a database when they only need select permissions on a handful of SQL views or tables. Whenever I create a new SQL view for a client I will create a database role to go with it, as best practice is to only grant the minimum permissions needed.

Below is a script example of creating a database role and then adding a couple of views in with select permissions; tables would be added in exactly the same way.

Once the role has been created you can assign it to any of the users required to have access to the objects to which it is granting access.

-- CREATE ROLE
CREATE ROLE rpt_AZRCRV_Reports
GO

-- ADD SELECT PERMISSIONS FOR VIEWS TO ROLE
GRANT SELECT ON uv_AZRCRV_POReqApprovalStatus TO rpt_AZRCRV_Reports
GRANT SELECT ON uv_AZRCRV_POPOrderApprovalStatus TO rpt_AZRCRV_Reports
GO

A role for stored procedures or function can be created in exactly the same way; the only difference is that you would be assigning EXECUTE permissions instead of SELECT.

In Microsoft Dynamics 365 Business Central, how do I… Create an Advanced Evaluation Company

Microsoft Dynamics 365 Business CentralThis post is part of the In Microsoft Dynamics 365 Business Central, how do I… series which I am posting as I familiarise myself with Microsoft Dynamics 365 Business Central.

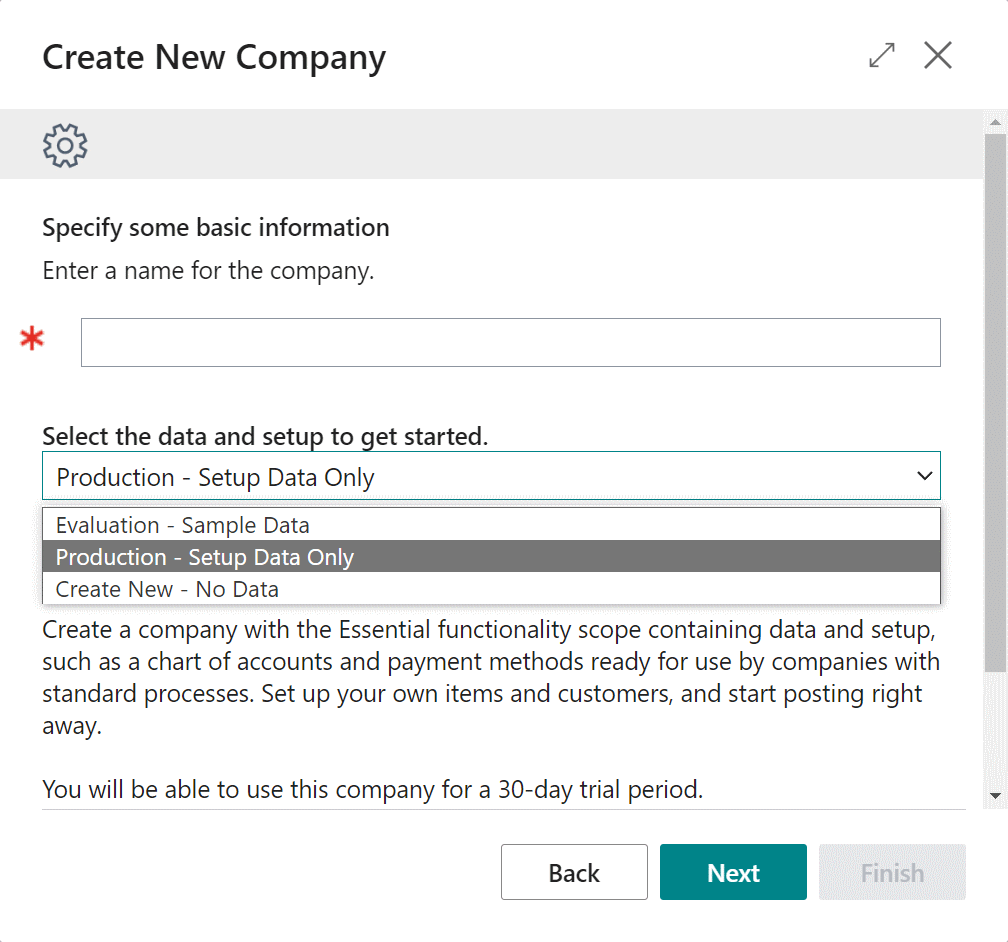
Backin August I showed how a new company can be created in Dynamic BC and said that there were three types of company which could be created:

New company types

  1. Evaluation - Sample Data - is a company similar to the demonstration company with both sample and setup data. You can create these companies without switching to a 30-day trial period (which the other types require).
  2. Production - Setup Data Only - is a company similar to the My Company company with setup data, but without sample data. This company can be used for a 30-day trial period.
  3. Create New - No Data - a blank company without setup data. This company can be used for a 30-day trial period.

Continue reading “In Microsoft Dynamics 365 Business Central, how do I… Create an Advanced Evaluation Company”

Manually Enable Jet Reports on a Terminal Server

Jet ReportsI’ve done some work with a client recently who has been a long time user of Jet Reports; they’ve recently merged with another company and needed some of the Jet Reports amended and deployed for the new companies which were added to Dynamics GP. The infrastructure and implementation decisions used by Jet Reports were made well before my involvement and, in some cases, they go against the recommendations of the vendor.

There are two key issues which we encountered rolling Jet Reports out to the new companies. The client does not use the Jet Service Tier which allows you to roll out settings to users from a central service and they have Jet Reports available to users as a published app rather than shared desktop.

The former item means a setup of connections on each client and the latter means this is not a supported configuration ( as mentioned in this article on the Jet Reports knowledge base Jet Reports can only be supported on a shared desktop).

This is something which needs to be discussed with the client, as they should really be operating using a supported method. However, the short term issue is how to get Jet reports available to users.

Usually you’d do this by using the Enable Jet Add-in app on the Windows start menu or launching Jet using the Jet Reports app. In this case, as a published app, the end-user does not have access to the Enable Jet Add-in app and the IT department was resistant to publishing the Jet Reports app.

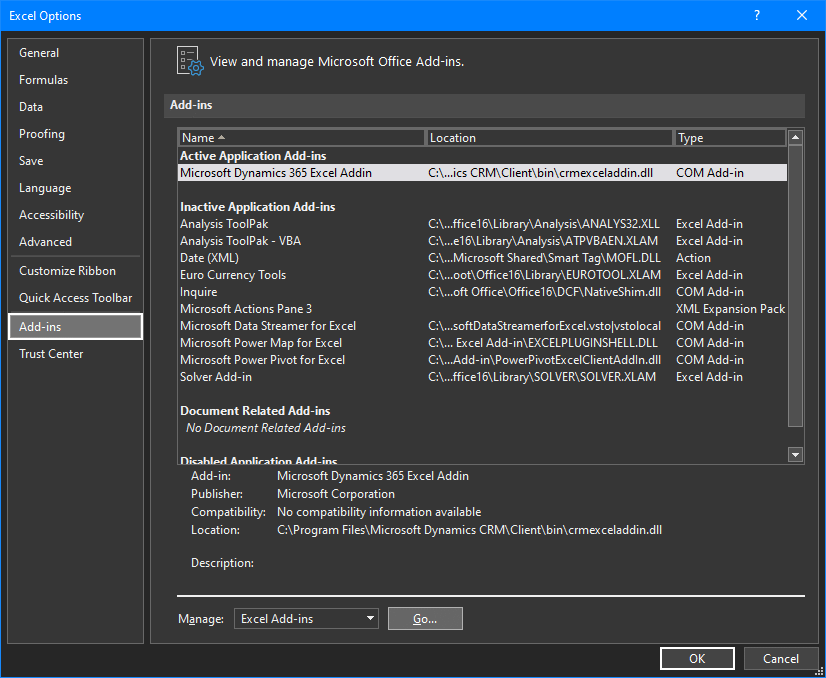
Instead we were able to get Jet Reports enabled in Excel by adding the add-in manually to Excel.

We did this by launching Excel from the Start menu and selecting (File » options). In the Options window select the Add-ins tab and click the GoManage Excel Add-ins:

Excel Options window

Continue reading “Manually Enable Jet Reports on a Terminal Server”

In Microsoft Dynamics 365 Business Central, how do I… Change My Role

Microsoft Dynamics 365 Business CentralThis post is part of the In Microsoft Dynamics 365 Business Central, how do I… series which I am posting as I familiarise myself with Microsoft Dynamics 365 Business Central.

Your role in Dynamics BC determines the default layout of your home screen; it doesn’t affect what you have access to, but what you se.

When you log into Dynamics BC, you will see the home page layout determined by your role:

Dynamics BC home page

Continue reading “In Microsoft Dynamics 365 Business Central, how do I… Change My Role”

PowerShell Snippets: Prompt for Multiple Inputs

PowerShellThis post is part of the series on PowerShell Snippets.

Over the last two posts of this series, I’ve shown PowerShell cmdlets which prompt for user input and prompt for secure entry of passwords. A PowerShell script can prompt for multiple inputs as well as output text to screen.

When I originally posted about the Write-Output cmdlet, I only showed how it could be used to output text; you can also use a couple of parameters with this command to change the foreground or background colour.

The below script example, shows two outputs to screen using these parameters as well as prompting the user to input two pieces of data:

Write-Host "Please enter details of the plugin release" -ForegroundColor Green

$ghRepository = Read-Host "Please enter the repository name"

$ghTag = Read-Host "Please enter the tag"

Write-Host "$ghRepository $ghTag will be released." -ForegroundColor Yellow -BackgroundColor Black

PowerShell Snippets: Prompt User for Password

PowerShellThis post is part of the series on PowerShell Snippets.

In this last post, in this series, I showed a PowerShell snippet which would prompt a user for input. This is fine if you are prompting for a username, filename, version tag or similar, but if you are prompting for a password, you would not want to expose to people watching over the users shoulder.

The Read-Host cmdlet has a parameter which will allow for secure prompting of passwords:

$Password = Read-Host "Enter your password" -AsSecureString

Adding the AsSecureString parameter will prompt for the password with a popup input box which obscures the password during entry.