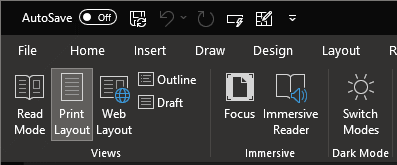
Disable Microsoft Word Dark Mode

MicrosoftA recent update to Microsoft Word saw the page background change from the white which has been used since forever; I’m assuming that I saw this change as I have office set to use the black theme. However, while I want the window black, I don’t want the page background to be black; I want it to continue being white.

There is a button on the action pane, on the View tab which allows you to toggle the view:

Dark Mode button on the action pane

Continue reading “Disable Microsoft Word Dark Mode”

Upcoming Microsoft Dynamics GP Webinars from ISC Software

ISC Software SolutionsEvery month at ISC Software I present a webinar on Microsoft Dynamics GP and related products. We typically have the next three upcoming monthly webinars I’ll be delivering scheduled.

We run these webinars on a monthly basis, with occasional extra webinars added to the schedule so it is worth checking the Webinar Schedule page every so often.

The upcoming webinars are:

Personalising  Microsoft Dynamics GP
In June is Personalising Microsoft Dynamics GP; Learn how users can personalise their Dynamics GP experience.

Tue, June 15th, 2021 4:00 PM – 4:45 PM BST

In this webinar we’ll take a look at the standard functionality in Dynamics GP which allows users to tailor their homepage to fit their needs and ways they can use this to work smarter, not harder

Register Here

Lesser Used Modules in Dynamics GP
In July is Lesser Used Modules in Dynamics GP; Explore some of the lesser used modules of Microsoft Dynamics GP and how they can improve processes.

Tue, July 20th, 2021 4:00 PM – 4:45 PM BST

This webinar will look at the modules included in the Microsoft Dynamics GP Starter and Extended Packs, picking out some of the modules which can save time but which aren’t as commonly used.

Register Here

Microsoft Dynamics GP Workflow
In August is Microsoft Dynamics GP Workflow; Discover how workflow can be used to require documents and master record changes to be approved, and enforce segregation of duties.

Tue, August 17th, 2021 4:00 PM – 4:45 PM BST

This webinar will look at the workflow approval types available in Dynamics GP and how they can be used to require documents or master record changes, or document submission to be approved. It will then delve further into the types of steps and routings available within workflow.

Register Here

ClassicPress Plugin Development: Create Submenu on Custom Top Level Menu

ClassicPress PluginsThis post is part of the ClassicPress Plugin Development series in which I am going to look at both best practice for developing plugins and how I approach some requirements as well as some of the functions I commonly use.

Once you have added a custom top level menu for your plugin, you can add submenu items. This is done using the add_submenu_page function:

add_submenu_page(string $parent_slug, string $page_title, string $menu_title, string $capability, string $menu_slug, callable $function = '', int $position = null)

Click to show/hide

$parent_slug (string) (Required) The slug name for the parent menu (or the file name of a standard WordPress admin page). $page_title (string) (Required) The text to be displayed in the title tags of the page when the menu is selected. $menu_title (string) (Required) The text to be used for the menu. $capability (string) (Required) The capability required for this menu to be displayed to the user. $menu_slug (string) (Required) The slug name to refer to this menu by. Should be unique for this menu and only include lowercase alphanumeric, dashes, and underscores characters to be compatible with sanitize_key(). $function (callable) (Optional) The function to be called to output the content for this page. Default value: '' $position (int) (Optional) The position in the menu order this item should appear. Default value: null

The below example is extracted from my To Twitter plugin which adds a submenu to the azrcrv-m menu item:

add_action('admin_menu', 'azrcrv_tt_create_admin_menu');

/**
 * Add to menu.
 *
 * @since 1.0.0
 *
 */
function azrcrv_tt_create_admin_menu(){
				
	add_submenu_page(
				'azrcrv-tt'
				,__('Send Tweet', 'to-twitter')
				,__('Send Tweet', 'to-twitter')
				,'manage_options'
				,'azrcrv-tt-smt'
				,'azrcrv_tt_display_send_manual_tweet');
				
}

This will add a second sublevel menu to the custom top level menu which takes the user to a different options page.

To add a custom top level menu to a network admin dashboard, change the admin_menu tag in the add_action function call to network_admin_menu.

Click to show/hide the ClassicPress Plugin Development Series Index

ClassicPress Plugin Development: Create Custom Top Level Menu

ClassicPress PluginsThis post is part of the ClassicPress Plugin Development series in which I am going to look at both best practice for developing plugins and how I approach some requirements as well as some of the functions I commonly use.

While it is most common to add an option spage for a plugin to the Settings or Security top level menu, it is possible to create a custom top level menu.

A top level menu can be created using the add_menu_page function:

add_menu_page(string $page_title, string $menu_title, string $capability, string $menu_slug, callable $function = '', string $icon_url = '', int $position = null)

Click to show/hide

$page_title (string) (Required) The text to be displayed in the title tags of the page when the menu is selected. $menu_title (string) (Required) The text to be used for the menu. $capability (string) (Required) The capability required for this menu to be displayed to the user. $menu_slug (string) (Required) The slug name to refer to this menu by. Should be unique for this menu page and only include lowercase alphanumeric, dashes, and underscores characters to be compatible with sanitize_key(). $function (callable) (Optional) The function to be called to output the content for this page. Default value: '' $icon_url (string) (Optional) The URL to the icon to be used for this menu.
  • Pass a base64-encoded SVG using a data URI, which will be coloured to match the color scheme. This should begin with 'data:image/svg+xml;base64,'.
  • Pass the name of a Dashicons helper class to use a font icon, e.g. 'dashicons-chart-pie'.
  • Pass 'none' to leave div.wp-menu-image empty so an icon can be added via CSS.
  • Default value: ''

Below is an example of a custom top level menu from my To Twitter plugin:

add_action('admin_menu', 'azrcrv_tt_create_admin_menu');

/**
 * Add to menu.
 *
 * @since 1.0.0
 *
 */
function azrcrv_tt_create_admin_menu(){

    add_menu_page(
				__('To Twitter', 'to-twitter')
				,__('To Twitter','to-twitter')
				,'manage_options'
				,'azrcrv-tt'
				,'azrcrv_tt_display_options'
				,'dashicons-twitter'
				, 50);
				
}

The top level menu automatically has a sublevel menu of the same name added; I’ll show how to rename this in the next post of this series.

To add a custom top level menu to a network admin dashboard, change the admin_menu tag in the add_action function call to network_admin_menu.

Click to show/hide the ClassicPress Plugin Development Series Index

Recent ISC Software Webinar: Business Intelligence with Microsoft Dynamics GP

ISC Software SolutionsIn our most recent webinar, we took a look at Business Intelligence with Microsoft Dynamics GP. In this webinar, we covered how business intelligence can be used with Microsoft Dynamics GP. If you want to catch up on this, or any other, webinar, you can do so here.

  1. Introduction
  2. What is Business Intelligence?
  3. What is Jet Analytics?
  4. Reporting options with Jet Analytics
  5. What is Power BI?
  6. Reporting options with Power BI
  7. Conclusion

Introduction ^

I think this webinar was the first one in which we didn’t even open Microsoft Dynamics GP. This because this webinar focused on how business intelligence can be used with Microsoft Dynamics GP. We focused on two business intelligence products which can be used to quickly build required dashboards and reporting for business intelligence.

The two products we looked at are complimentary and can be used both together or independently. They are Jet Analytics and PowerBI

Continue reading “Recent ISC Software Webinar: Business Intelligence with Microsoft Dynamics GP”

VBA Snippets: Select Records from Microsoft Dynamics ODBC Connection

MicrosoftThis post is part of the series on VBA Snippets.

In yesterdays post, I covered adding an ODBC connection to Microsoft Dynamics GP VBA for use n windows or reports. The below is an example of a SQL query using the ODBC connection.

SOPType and SopNUmber (highlighted) are fields from a window added to the VBA.

This example retries a list of fields from the Sales Transaction Amounts Work (SOP10200) table.

Dim objRS As ADODB.RecordSet
Set objRS = New ADODB.RecordSet
Set objRS.ActiveConnection = madoConn
sSQL = "SELECT * FROM SOP10200 WHERE SOPTYPE = " & SOPType & " AND SOPNUMBE = '" & SOPNumber & "'"
objRS.Source = sSQL
objRS.Open

If objRS.State = adStateOpen Then
	If Not (objRS.BOF Or objRS.EOF) Then
		objRS.MoveFirst
		
		Do While Not objRS.EOF
			' your code goes here; reference fields using objRS.fields("fieldname"))
		
			objRS.MoveNext
		Loop
	End If
	objRS.Close
End If
Set objRS = Nothing

VBA Snippets: Adding an SQL ODBC Connection in Microsoft Dynamics GP

MicrosoftThis post is part of the series on VBA Snippets.

There is an ADO connection available to VBA within Microsoft Dynamics GP which you can use, but there are some steps you need to follow to use it.

The first step is to declare the variable which will hold the connection.

Private madoConn AS ADODB.Connection

Then you need to create the connection which this example does using a Connect subroutine:

Private Sub Connect()
	If madoConn.State <> adStateOpen Then 
		Set madoConn = UserInfoGet.CreateADOConnection
		madoConn.DefaultDatabase = UserInfoGet.IntercompanyID
	End If
End Sub

It checks if the connection is already open and, if not, uses the UserInfoGet object which holds the connection detail exposed in Dynamics GP; I am also using the same object to set the default database property.

Once connected you can use the connection to execute SQL queries; I’ll show some examples of this in later posts.

When you’re finished with the connection, you can close and destroy the connection:

Private Sub Disconnect()
    If madoConn.State = adStateOpen Then madoConn.Close
    Set madoConn = Nothing
End Sub

ClassicPress Plugin Development: Add Plugin Options Page to Security Main Menu

ClassicPress PluginsThis post is part of the ClassicPress Plugin Development series in which I am going to look at both best practice for developing plugins and how I approach some requirements as well as some of the functions I commonly use.

When developing a plugin, it is usual to create an options page to allow users to configure the plugin. The most common way of making the plugin options page available to users is to add it to the Settings menu in the admin dashboard; however, ClassicPress has a Security menu available which allows security plugins to be separated from the other settings on a site. This Security menu does not exist in WordPress so if you’re writing a plugin to be compatible with both ClassicPress and WordPress you will need to manage this when adding the options page.

This is done using the add_security_page function available with ClassicPress.

add_security_page(string $page_title, string $menu_title, string $menu_slug, callable $function = '')

Parameters

$page_title (string) (Required) The text to be displayed in the title tags of the page when the menu is selected. $menu_title (string) (Required) The text to be used for the menu. $menu_slug (string) (Required) The slug name to refer to this menu by (should be unique for this menu); must match an active plugin or mu-plugin slug.. $function (callable) (Optional) The function to be called to output the content for this page. Default value: ''

Return

(string|false) The resulting page's hook_suffix, or false if the user does not have the capability required.

The function above is made accessible using the add_action function along with a admin_menu tag.

The below is an example, including check for the security menu being available, of an options page using my vendor prefix of azrcrv and a plugin identifer of XXXX:

add_action('admin_menu', 'azrcrv_XXXX_add_options_page');

function azrcrv_XXXX_add_options_page() {
	if (function_exists('add_security_page')){
		add_security_page( 
			esc_html__('XXXX Options', 'text-domain'),
			esc_html__('XXXX', 'text-domain'),
			dirname(plugin_basename(__FILE__ )),
			'azrcrv_XXXX_display_options_page'
		);
	}else{
		// add options in WordPress compatible way; possibly using the add_options_page function.
	}
}

If the menu being added is for a network, rather than individual site, the $tag would be network_admin_menu instead of admin_menu.

When an options page is added to the Security menu, a plugin action link is automatically added:

Security plugin action link example

Click to show/hide the ClassicPress Plugin Development Series Index

ClassicPress Plugin Development: Add Plugin Options Page to Settings Main Menu

ClassicPress PluginsThis post is part of the ClassicPress Plugin Development series in which I am going to look at both best practice for developing plugins and how I approach some requirements as well as some of the functions I commonly use.

When developing a plugin, it is usual to create an options page to allow users to configure the plugin. The most common way of making the plugin options page available to users is to add it to the Settings menu in the admin dashboard.

This is done using the add_options_page function available with ClassicPress.

add_options_page(string $page_title, string $menu_title, string $capability, string $menu_slug, callable $function = '', int $position = null)

Parameters

$page_title (string) (Required) The text to be displayed in the title tags of the page when the menu is selected. $menu_title (string) (Required) The text to be used for the menu. $capability (string) (Required) The capability required for this menu to be displayed to the user. $menu_slug (string) (Required) The slug name to refer to this menu by (should be unique for this menu). $function (callable) (Optional) The function to be called to output the content for this page. Default value: '' $position (int) (Optional) The position in the menu order this item should appear. Default value: null

Return

(string|false) The resulting page's hook_suffix, or false if the user does not have the capability required.

The function above is made accessible using the add_action function along with a admin_menu tag.

The below is an example of an options page using my vendor prefix of azrcrv and a plugin identifer of XXXX:

add_action('admin_menu', 'azrcrv_XXXX_add_options_page');

function azrcrv_XXXX_add_options_page() {
    add_options_page( 
        esc_html__('XXXX Options', 'text-domain'),
        esc_html__('XXXX', 'text-domain'),
        'manage_options',
        dirname(plugin_basename(__FILE__ )),
        'azrcrv_XXXX_display_options_page'
    );
}

If the menu being added is for a network, rather than individual site, the $tag would be network_admin_menu instead of admin_menu.

Click to show/hide the ClassicPress Plugin Development Series Index

ClassicPress Plugin Development: Create a Plugin Action Link

ClassicPress PluginsThis post is part of the ClassicPress Plugin Development series in which I am going to look at both best practice for developing plugins and how I approach some requirements as well as some of the functions I commonly use.

When developing a plugin with an settings page, it is quite common to add a link to the settings page on the Plugins page; these links are known as plugin action links. This is an example from my URL Shortener plugin:

URL Shortener action link

The plugin action link can be added by using the add_filter function:

add_filter(string $tag, callable $function_to_add, int $priority = 10, int $accepted_args = 1)

The $tag to use is plugin_action_links, the $function_to_add is the function you need to write to add the link and the accepted_args is 2

Below is an example of the filter using the plugin_action_links tag to add the link to the URL Shortener plugin’s settings page:

add_filter('plugin_action_links', 'azrcrv_urls_add_plugin_action_link', 10, 2);

The azrcrv_urls_add_plugin_action_link function called by the filter is:

/**
 * Add URL Shortener action link on plugins page.
 *
 * @since 1.0.0
 *
 */
function azrcrv_urls_add_plugin_action_link($links, $file){
	static $this_plugin;

	if (!$this_plugin){
		$this_plugin = plugin_basename(__FILE__);
	}

	if ($file == $this_plugin){
		$settings_link = '<a href="'.admin_url('admin.php?page=azrcrv-urls').'">'.esc_html__('Settings' ,'url-shortener').'</a>';
		array_unshift($links, $settings_link);
	}

	return $links;
}

The highlighted section is the menu_slug for the settings page.

Click to show/hide the ClassicPress Plugin Development Series Index