Update Microsoft Dynamics GP Account Categories From Text File

Microsoft Dynamics GPI’ve recently been working with a client to implement Jet Reports as a replacement for Management Reporter. As part of this implementation, it was necessary to change the account categories in Microsoft Dynamics GP.

This particular client has over 1 million account strings in their chart of account which meant any update could not be done manually. While it could technically be done through Integration Manager this would have meant integrating a 1 million plus line file, which again wasn’t really feasible.

Instead what we did was have the client compile a list of the natural segment (the third segment) along with the new category and I created an update script to use this file to update Account Category Master (GL00102).

The below script creates a temporary table, imports the text file and then updates all the account category on all accounts in Breakdown Account Master (GL00100) based on the third segment.

/*
Created by Ian Grieve of azurecurve | Ramblings of an IT Professional (http://www.azurecurve.co.uk) This code is licensed under the Creative Commons Attribution-NonCommercial-ShareAlike 4.0 International (CC BY-NC-SA 4.0 Int). */
CREATE TABLE #IMPORT ( ACTNUMBR_3 VARCHAR(4) ,ACCATDSC VARCHAR(50) ) GO BULK INSERT #IMPORT FROM 'C:\Temp\Categories.txt' WITH ( FIELDTERMINATOR = '\t' ,ROWTERMINATOR = '\n' ,FIRSTROW = 1 ) GO UPDATE ['Account Index Master'] SET ACCATNUM = ['Account Category Master'].ACCATNUM FROM GL00100 AS ['Account Index Master'] INNER JOIN #IMPORT ON #IMPORT.ACTNUMBR_3 = ['Account Index Master'].ACTNUMBR_3 INNER JOIN GL00102 AS ['Account Category Master'] ON ['Account Category Master'].ACCATDSC = #IMPORT.ACCATDSC GO DROP TABLE #IMPORT GO

As always when running a script which does updates, make sure you have a good backup, test the script in a test company and verify the update before repeating on live.

SQL Snippets: Create and Use Database Role to Restrict Access

Microsoft SQL ServerThis post is part of the series on SQL Snippets.

I create a lot of SQL objects such as views, tables, stored procedures and so on. If they will be used from within Microsoft Dynamics then they can simply be assigned to the DYNSA role, but if they are for use in custom reporting or integrations then separate security will be required.

Usually for reporting, and especially for integrations, security will be as locked down as possible to minimise any possible attack vector. This can be done in SQL through a security role with only limited security granted to the necessary users.

The first step is to create the role itself; I always do this using a role with a name prefixed with urpt_ so that it can easily be identified as a custom user role:

-- creatr security role on database
CREATE ROLE [urpt_Role] AUTHORIZATION [dbo]
GO

Then we grant the relevant permissions to the new role. For a report this would mean only granting select permissions on the relevant views and tables; for an integration there may be inserts and updates granted.

-- grant permission to role on object
GRANT SELECT ON [dbo].[uv_SQLView] TO [urpt_Role]
GRANT SELECT ON [dbo].[GL20000] TO [urpt_Role]
GRANT SELECT ON [dbo].[GL30000] TO [urpt_Role]
GO

For a report, you may need to create a database user for the user or AD group:

-- create user on database
CREATE USER [DOMAIN\user]
GO

The final step is to assign the role to the relevant users or AD groups:

-- assign role to user on database
ALTER ROLE [urpt_Role] ADD MEMBER [DOMAIN\user]
GO

Check For Colour Accessibility (A11y)

Useful WebsitesI’ve posted about a few useful websites as a way of remembering and finding them again. Today I am posting another one which is about colour accessibility.

Back in September 2020, I posted about a site called ColorHexa which you can use to generate matching colour palettes. This is good as far as it goes, but for web design best practice is that websites need to be accessible.

This is recommended for ClassicPress developers to make sure their plugins and themes are accessible, but it is also required for designers and content producers.

The ColorHexa website will give you matching palettes, but many times you will want to pick your own colours or change from the ones supplied by a site like ColorHexa. That’s where the Adobe Color site can come in very useful as it has two tools for checking the accessibility of color.

Continue reading “Check For Colour Accessibility (A11y)”

ClassicPress Plugin Development: Save an Options Page

ClassicPress PluginsThis post is part of the ClassicPress Plugin Development series in which I am going to look at both best practice for developing plugins and how I approach some requirements as well as some of the functions I commonly use.

Once you have an options page created, you need to create the process to save the options when the user changes them.

The example I am using in this post is from my Remove Revisions plugin which uses a PHP namespace.

namespace azurecurve\RemoveRevisions;

Continue reading “ClassicPress Plugin Development: Save an Options Page”

Error Entering Invoice in Microsoft Dynamics GP When Multiple Bins Enabled

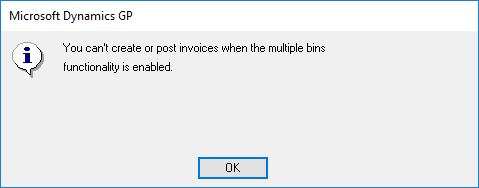
Microsoft Dynamics GPI’ve been working on a project implementing Microsoft Dynamics GP for a new client recently. They are a manufacturing company who have bins enabled for storing and tracking items as they move through the factory; goods booked in or out through POP and SOP were also recorded to and from bins. One day during UAT (user acceptance testing) I received an email from the client that users were receiving an error that they could not create or post invoices when multiple bins were enabled:

Bin error trying to access Invoice Entry

You can't create or post invoices when the multiple bins functionality is enabled.

At this time security was still being configured so users had access to more than they would usually have had. The issue was that a user had tried, when wanting to process a sales invoice, had tried to access Invoice Entry which is part of the deprecated Invoicing module instead of Sales Transaction Entry.

We pointed the users at the correct window and got the creation of security roles prioritised a little higher so that users didn’t get confused by windows on the menu they would not be using.

VBA To Insert Next Microsoft Dynamics GP DD Transaction Code

Microsoft Dynamics GPI am tending to encourage clients to use SmartConnct from eOne Solutions for integrating data into Microsoft Dynamics GP, but I do still have quote a few clients using Integration Manager.

SmartConnect supports the use of custom eConnect nodes which I have created for a few clients, either manually or through using Node Builder (also from eOne).

You can accomplish the same result through Integration Manager by extending the integration using VBA. I had a client a while ago who were using the Direct Debits & Refunds module. This means that each transaction needs to have a DD Transaction Code code stamped on it, which Integration Manager doesn’t do. However, with a little VBA, this can be accomplished.

In the Before Integration script we instantiate the ODBC connection:

/*
Created by Ian Grieve of azurecurve | Ramblings of an IT Professional (http://www.azurecurve.co.uk) This code is licensed under the Creative Commons Attribution-NonCommercial-ShareAlike 4.0 International (CC BY-NC-SA 4.0 Int). */
' BEFORE INTEGRATION Dim oCon Set oCon = CreateObject("ADODB.Connection") oCon.ConnectionString = "database=" & GPConnection.GPConnIntercompanyID GPConnection.Open(oCon) SetVariable "gblCon", oCon

Continue reading “VBA To Insert Next Microsoft Dynamics GP DD Transaction Code”

Upgrading Post Master Enterprise

Microsoft Dynamics GPEarlier this year I did a series on Implementing Post Master Enterprise from Envisage Software.

This is one of my favourite addons for Microsoft Dynamics GP which I have implemented for quite a few customers, including two in the last month. The basic functionality is that it will run as a Windows service and automatically post batches which match the autodetection rules. Envisage also make regular updates to the product both to improve functionality and to fix any issues which arise.

While upgrading some products is complicated, upgrading Post Master is nice and straightforward. All you need to do, is uninstall the previous version and install the new following the installation for a new implementation and updating the serviec to auto start and logon with the correct account.

Error Posting Dynamics GP Payables Batch In New Company

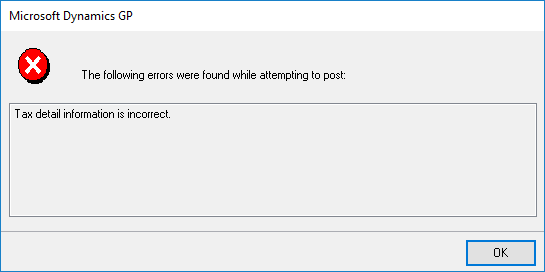
Microsoft Dynamics GPI noticed recently that if you create a new company in Microsoft Dynamics GP and then use the Company Copy function of the PSTL (Professional Services Tools Library) you will receive an error when trying to post transactions from the Payables Management module:

Error when posting batch

The following errors were found while attempting to post

Tax detail information is incorrect.

The issue is that while PSTL will copy the tax schedules and details across, it doesn’t actually copy all of the related information across in the background. The fix is quite simple; each tax detail needs to be loaded and saved in the Tax Detail Maintenance window (Administration area page » System » Company » Tax Details).

Upcoming Microsoft Dynamics GP Webinars from ISC Software

ISC Software SolutionsEvery month at ISC Software I present a webinar on Microsoft Dynamics GP and related products. We typically have the next three upcoming monthly webinars I’ll be delivering scheduled.

We run these webinars on a monthly basis, with occasional extra webinars added to the schedule so it is worth checking the Webinar Schedule page every so often.

The upcoming webinars are:

Getting More From Dynamics GP
In September is Getting More From Dynamics GP; Learn how to get more out of Microsoft Dynamics GP.

Tue, September 14th, 2021 4:00 PM – 4:45 PM BST

Watch while an experienced consultant shows you some tips and tricks to improve your use of Dynamics GP using standard functions and features available now.

Register Here

Upgrading ​Microsoft Dynamics GP​
In October is Upgrading ​Microsoft Dynamics GP​; this webinar will look at the reasons for and process of upgrading Dynamics GP, including an overview of the cloud options.​​.

Tue, October 19th, 2021 4:00 PM – 4:45 PM BST

Register Here

SmartList Tips and Tricks
In November is SmartList Tips and Tricks; Learn from an experienced consultant who will demonstrate some tips and tricks which will allow you to get the most benefit from SmartList.​​

Tue, November 16th, 2021 4:00 PM – 4:45 PM BST

Register Here

ClassicPress Plugin Development: Create an Options Page

ClassicPress PluginsThis post is part of the ClassicPress Plugin Development series in which I am going to look at both best practice for developing plugins and how I approach some requirements as well as some of the functions I commonly use.

Anything more than a very simple plugin will hae options which the site administrator will need to be able to change. this means an options page which is added to the settings menu. ClassicPress does have a settings API which can be used; however, I do not use this API as I’ve previously found it to be overly complex and difficult to use, so I roll my own settings pages.

The example in this post are from my Remove Revisions plugin which uses a namespace:

namespace azurecurve\RemoveRevisions;

As I am using a namespace the options page was added in a function simply called display_options; if a namespace wasn’t in use, I’d have used a vedor/plugin prefix and called the function azrcrv_rr_display_options.

The example takes advantage of the page title from the settings menu (which I covered in the last post as well as loading options, which can be done
with defaults or with with multilevel defaults.

Below is a sample of the display_options from Remove Revisions with the controls removed, leaving behind the basic framework of the page, with the header, load of options and then the form with submit button:

/**
 * Display Settings page.
 *
 * @since 1.0.0
 *
 */
function display_options(){

	if (!current_user_can('manage_options')){
        wp_die(esc_html__('You do not have sufficient permissions to access this page.', 'remove-revisions'));
    }
	
	// Retrieve plugin configuration options from database
	$options = get_option_with_defaults('azrcrv-rr');	
	
	?>
	
	<div id="azrcrv-rr-general" class="wrap">
		
		<h1>
			<?php
				esc_html_e(get_admin_page_title());
			?>
		</h1>
		
		<form method="post" action="admin-post.php">
			
			<input type="hidden" name="action" value="azrcrv_rr_save_options" />
			<input name="page_options" type="hidden" value="enable-cron" />
			
			<?php
				//
				wp_nonce_field('azrcrv-rr', 'azrcrv-rr-nonce');
			?>
			
			/*
				your options here
			*/
			
			<input type="submit" name="btn_save" value="<?php esc_html_e('Save Settings', 'remove-revisions'); ?>" class="button-primary"/>
		</form>
	</div>
	<?php
	
}

The hidden input action and the wp_nonce_field is used for the save of the options, which I’ll cover in the next post in this series.

Click to show/hide the ClassicPress Plugin Development Series Index