 In the last couple of posts in this series, we have deployed the system database and Fabrikam sample database. In this post, I’m going to create a new company using GP Utilities.
Enter the user and password and click OK to log in:

On the Welcome screen click Next:

A check will be performed to ensure the database version matches the GP Utilities version. After confirming this check has been successful, click Next

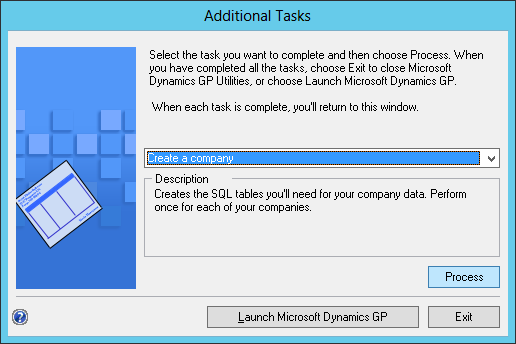
The next stage displayed will be the Additional Tasks one; set the drop down list to Create a company and click Process:

In line with changing the system database name to D16R1 and the sample company database name to T16R1 I have named the new company database P16R1 and entered a Company Name of Perfect Image Limited.

The Location fields will default to the install folder of SQL Server so change them to the required location and clikc Next:.

Check the settings on the Confirmation screen and, if happy, click Finish:

Once the database has been created and all SQL objects deployed, the next step is to select which BI reports should be deployed. I am deploying both so have marked both the Microsoft SQL Server Reporting Services reports and Microsoft Excel reports and data connections checkboxes:

The settings on the SQL Server Reporting Services Reports Setup will default to those configured when deploying the system database. Verify the settings are correct and click Next

Likewise the settings for the Excel Reports Setup will default in, so click Next:

Check the selections on the Confirmation screen and click Finish to deploy the BI reports (if you are working with a new SQL Server make sure the maxRequestLength setting in SSRS has been set to 20690 before clicking Finish):

Once the reports have been deployed the Company Setup Options screen will be displayed. Leave the Set up the company later checkbox marked and click Next:

On the Additional Tasks screen, click Exit:
In the next post, we’ll run the desktop client for the first time.
Click to show/hide the Hands On With Microsoft Dynamics GP 2016 R1 Series Index
What should we write about next?
If there is a topic which fits the typical ones of this site, which you would like to see me write about, please use the form, below, to submit your idea.
4 thoughts on “Hands On With Microsoft Dynamics GP 2016 R1: Create Company”