 Microsoft Dynamics GP 2015 R2 was released at the end of May. As I mentioned at the time, I was away from home for work and rather busy otherwise so this series of posts has been somewhat delayed.
However, I am now getting my hands on GP 2015 R2 and thought I would do my usual set of posts on the installation of the various components and also the usage of the new functionality. This is going to be quite a long series of posts, so keep checking back regularly.
The second post in this series, covers the installation of the System database. This is the database which holds the deployed companies and security configuration amongst oither items. To install the System database, run GP Utilities from the Start screen.
Despite what seems to be a regular argument I seem to have with Infrastructure people, you must log into GP Utilities using the sa account in order to be able to install the System database (no “ifs”, no “buts”; it must be sa):

On the Welcome to Microsoft Dynamics GP Utilities page, click Next:

For the Installation Options, it is inadvisable to select the Basic configuration, so mark Advanced and click Next:

Check that the location of the Data and Log files are set to the correct values; I typically find that they have defaulted to the installation folder of SQL Server rather than the default Data and Log folders specified when configuring SQL Server so update then accordingly and click Next:

Set the Maximum Account Length to 66 and the Maximum Number of Segments to 10; regardless of the account format you intend to use it is always best to set the Microsoft Dynamics GP Account Framework to the maximum allowed so that you have space for expansion in future. Click Next to proceed:

Name the Segments (which for the Fabrikam sample company are Division, Account and Department); it is always best to name them as it makes reporting in SmartList or Management Reporter easier.
Set the maximum length of each segment; the default is 6 and I typically leave the segment at this length unless the client has specified that they will have a longer segment; I will then try to discover why and discourage them if possible as accounts should be as easy as possible for people to type.
Click Next:

Choose whether to define additional sorting options. I have opted to do so:

Select the additional segments which will be available for sorting and click Next:

Verify the account framework and click Next:

Enter the password for the DYNSA user; this account should be configured in SQL Server as a security admin (I’d have sworn that I did a post on this, but I can’t find it anywhere; keep your eyes open as I will be blogging about this soon):

If you intend to use the web client, which I do, mark the Using web client checkbox and then enter a Login Name, Password and Confirm Password and click Next:

Chose the Authentication Type for web client only users; the options are Windows Account if you’re using a standard Windows AD Domain or an Organisation Account if you’re using Azure, O365 or other Microsoft account:

Enter a System Password; I haven’ty done that here as I am installing a test system, but it is advisable for a live system:

Check the settings and confirm the installation of the System database by clicking Finish:

I am not deploying the Business Intelligence reports just yet, so I have left the checkboxes unmarked:

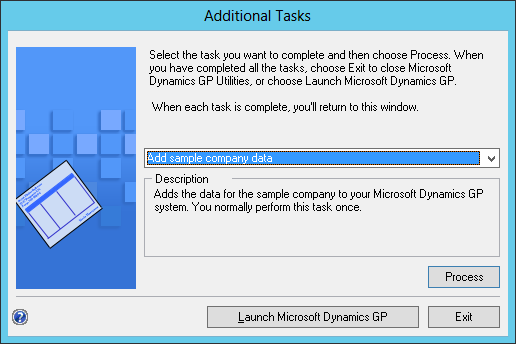
The final page is the Additional Tasks window. Click Exit to close GP Utilities:
Click to show/hide the Hands On With Microsoft Dynamics GP 2015 R2 Series Index
What should we write about next?
If there is a topic which fits the typical ones of this site, which you would like to see me write about, please use the form, below, to submit your idea.
1 thought on “Hands On With Microsoft Dynamics GP 2015 R2: Install System Database”